Table of Contents
There’s something so satisfying about making your own snacks from scratch, especially when they involve wild game like venison. I still remember the first time my husband Eric brought home his deer harvest and we stood in our little yellow farmhouse kitchen wondering, “What now?” That’s when this venison snack stick recipe became a staple in our home. If you’re looking for a protein-packed, flavorful snack that’s perfect for hiking, school lunches, or just everyday snacking, you’re in the right place. The best part? You only need 5 simple ingredients to create these delicious meat sticks that will impress even the most discerning snack enthusiasts.
If you enjoy working with venison, you might also want to check out my venison cube steak recipes for more ways to use this wonderful meat.
Why You’ll Love This Recipe
There’s so much to love about homemade venison snack sticks! First off, they’re incredibly economical if you’re a hunting family like ours. We make batches of these throughout the year, and they cost a fraction of what you’d pay for commercial jerky or meat sticks.
Beyond the budget-friendly aspect, these snack sticks put you in control of exactly what goes into your food. No mysterious preservatives or artificial ingredients – just wholesome components you can pronounce and feel good about feeding to your family. My 6-year-old Lila has become quite the little helper in the kitchen when we make these, proud to be creating her own “special snacks” for school.
The recipe is remarkably versatile too. Once you master the basic technique, you can customize the flavors endlessly. Eric likes his with extra pepper, while I prefer a smoky paprika version. We’ve even made a milder batch with less seasoning that even 3-year-old Caleb enjoys (though he still prefers sneaking chocolate chips when he thinks I’m not looking).
Ingredients
For this simple venison snack stick recipe, you’ll only need these 5 ingredients:
- 2 pounds ground venison (10-15% fat content)
- ¼ cup curing salt (Prague Powder #1)
- 2 tablespoons black pepper
- 1 tablespoon garlic powder
- 1 tablespoon onion powder
Substitution Tips:
- If your venison is extremely lean, you can mix in 20% ground pork or beef fat for better texture and binding.
- No curing salt? While I strongly recommend it for food safety, you can use regular salt but will need to refrigerate the snack sticks and consume them within a week.
- Feel free to experiment with different seasonings like smoked paprika, cayenne, or even a pre-mixed sausage seasoning blend.
Like having tasty snacks on hand? My bacon-wrapped little smokies recipe is another crowd-pleaser for gatherings!
Timing
- Prep Time: 30 minutes
- Curing Time: 24 hours
- Cooking Time: 4-5 hours
- Total Time: 29-30 hours (includes curing and cooling)
Yes, this is definitely a weekend project, but trust me when I say the results are absolutely worth the time investment! Most of the hours are hands-off, letting time do the magic of developing those amazing flavors.
Step-by-Step Instructions
Step 1: Prepare the Meat Mixture
In a large mixing bowl, combine the ground venison with the curing salt, black pepper, garlic powder, and onion powder. Using clean hands (my preferred method) or a stand mixer with a paddle attachment, mix thoroughly until all the seasonings are evenly distributed throughout the meat.
The key here is thorough mixing – spend at least 5 minutes working the mixture to ensure the curing salt is completely incorporated. This isn’t just for flavor; it’s for food safety too!
Step 2: Let the Mixture Rest and Cure
Transfer the seasoned meat mixture to a large ziplock bag or covered container. Press out as much air as possible and seal tightly. Place in the refrigerator for 24 hours to allow the curing process to work its magic.
This resting period is non-negotiable! The curing salt needs time to properly preserve the meat and develop that characteristic tangy snack stick flavor we all love.
Step 3: Prepare Your Equipment
If using a smoker (my preferred method), preheat to 165°F (74°C). If using an oven, preheat to the lowest setting, ideally around 170°F (77°C).
For forming the sticks, you have several options:
- Use a sausage stuffer with 19-21mm casings
- Form the meat mixture into thin logs by hand
- Press the mixture into a jerky gun if you have one
Step 4: Form the Snack Sticks
Remove the meat mixture from the refrigerator. If using casings, stuff the mixture into the casings according to your stuffer’s instructions, twisting every 6 inches to create individual sticks.
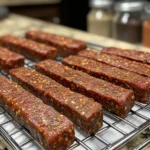
If going the no-casing route, roll the mixture into logs about ½-inch in diameter and 6 inches long. Place them on a wire rack over a baking sheet to catch drippings.
Step 5: Cooking Process
Place your formed sticks in the smoker or oven. If using a smoker, add your favorite wood chips – hickory or apple wood pairs beautifully with venison.
Start with these temperature stages:
- Smoke/cook at 165°F (74°C) for 1 hour
- Increase temperature to 175°F (79°C) for 1 hour
- Raise to 185°F (85°C) for 1 hour
- Finally, finish at 195°F (91°C) until the internal temperature reaches 160°F (71°C)
The gradual temperature increase prevents the casings from splitting and allows the meat to cook evenly throughout.
Step 6: Cool and Store
Once cooked, remove the snack sticks and let them cool at room temperature for about an hour. This cooling period is important as it lets the texture set properly.
After cooling, you can store them in airtight containers or vacuum-sealed bags. They’ll keep at room temperature for 1-2 weeks, in the refrigerator for up to a month, or in the freezer for up to 6 months.
Cooking Tips
Over the years of making these venison snack sticks in my farmhouse kitchen, I’ve discovered a few tricks that make a world of difference:
- Temperature is crucial: Use a reliable meat thermometer to ensure your sticks reach the safe internal temperature of 160°F (71°C).
- Fat content matters: Too lean, and your sticks will be dry and crumbly. Aim for 10-15% fat content in your final mixture.
- Proper mixing: The more you mix the meat with the seasonings, the better the texture. I mix until the meat becomes slightly sticky, which helps with binding.
- Consistent sizing: Try to make your sticks uniform in size for even cooking.
- Let them cure fully: Don’t rush the 24-hour curing time – it’s essential for both flavor and preservation.
- Watch humidity: If your smoker or oven runs dry, place a small pan of water inside to maintain some moisture during cooking.
Personal Story
Our family’s love for these venison snack sticks began about four years ago when Eric had his most successful hunting season yet. We were blessed with more venison than we knew what to do with, and I was determined not to waste a single ounce.
My grandmother had always made homemade sausages when I was growing up, and while I didn’t have her exact recipe, I remembered watching her hands work the meat, adding spices by feel rather than measurement. Standing in my kitchen with pounds of ground venison, I felt her presence as I experimented with different spice combinations.
The first batch was a disaster – too salty and dry as a bone! But by the third attempt, we struck gold. Now, making these snack sticks has become a post-hunting season tradition in our household. Lila proudly tells her kindergarten friends that she makes her own “special sticks” that are better than anything from the store. There’s something deeply satisfying about continuing this tradition of food preservation and seeing my children develop the same appreciation for homemade goodness that my grandmother instilled in me.
Nutritional Information
Venison snack sticks aren’t just delicious – they’re nutritionally impressive too! Here’s why these make a smart snack choice:
- High protein: Venison is an excellent lean protein source, with about 7-8g of protein per snack stick.
- Lower fat: Compared to beef snack sticks, venison naturally contains less saturated fat.
- Iron-rich: Venison provides substantial iron, which is especially important for women and growing children.
- No artificial preservatives: When you make them at home, you avoid the nitrates and preservatives found in commercial products.
- Calorie-conscious: Each stick contains approximately 70-90 calories, making them a satisfying but reasonable snack.
The curing salt does add sodium, so these should be enjoyed in moderation if you’re watching your salt intake.
Healthier Alternatives
If you’re looking to make this venison snack stick recipe even healthier, here are some modifications to consider:
- Reduce sodium: You can decrease the amount of curing salt slightly, though you’ll need to refrigerate the sticks and consume them more quickly.
- Spice alternatives: Add antioxidant-rich spices like turmeric or cinnamon for additional health benefits.
- Leaner version: While some fat is necessary for texture, you can use the leanest venison possible and add just 5-10% pork fat instead of 20%.
- Natural sweetener: Add a tablespoon of honey or maple syrup to the mix for natural sweetness without refined sugar.
- Smoke naturally: If using a smoker, the natural wood smoke adds flavor without extra sodium or artificial ingredients.
Serving Suggestions
These versatile venison snack sticks shine in so many situations:
- Pack them in school lunches for protein-rich, shelf-stable snacks.
- Create an elevated charcuterie board by slicing them diagonally alongside cheeses like sharp cheddar or gouda.
- Use them as hiking fuel – they’re lightweight and energy-dense for outdoor adventures.
- Dice them up and add to scrambled eggs for a protein-packed breakfast.
- Serve alongside a tangy mustard dipping sauce for a simple appetizer.
- Include them in gift baskets with homemade jams and crackers.
My favorite way to serve them is actually the simplest – alongside a crisp apple for the perfect sweet-savory snack combination that keeps me going through busy afternoons.
Common Mistakes to Avoid
Even experienced cooks can run into challenges with this venison snack stick recipe. Here are the most common pitfalls and how to avoid them:
- Skipping the cure: The curing salt is non-negotiable for food safety when making shelf-stable snacks. Don’t substitute with regular salt if you plan to store these at room temperature.
- Cooking too hot, too fast: Rushing the temperature increases will cause the fat to render out too quickly, resulting in dry sticks.
- Inconsistent mixing: If you don’t mix thoroughly, some areas may not cure properly, creating inconsistent flavor and preservation.
- Over-stuffing casings: If using casings and you pack them too tightly, they’re likely to burst during cooking.
- Ignoring internal temperature: Always verify your sticks reach 160°F (71°C) for food safety.
- Cutting cooling time short: The cooling period is critical for texture development; rush this step and your sticks might have an unpleasant mouthfeel.
Storing & Reheating Tips
One of the greatest benefits of these homemade venison snack sticks is their longevity. Here’s how to maximize their shelf life:
Short-term storage:
- Store in paper bags at room temperature for 2-3 days for the best texture.
- For 1-2 weeks of storage, keep them in an airtight container at room temperature.
Long-term storage:
- Refrigerate in airtight containers for up to a month.
- For extended storage, vacuum-seal in portion-sized packs and freeze for up to 6 months.
- For gift-giving, wrap portions in butcher paper and include storage instructions.
Reheating (though usually enjoyed cold):
- If you prefer them warm, 10 seconds in the microwave will take the chill off.
- Alternatively, wrap in foil and warm in a 250°F (121°C) oven for 5 minutes.
Reviving dried-out sticks:
- If they’ve become too dry, wrap in a damp paper towel and microwave for 5-7 seconds to restore some moisture.
If you enjoy making your own preserved meats, you might also like my Canadian bacon recipe for another delicious homemade protein option!
FAQs
Q: Can I make venison snack sticks without a smoker?
A: Absolutely! While smoking adds excellent flavor, you can achieve great results using a regular oven set to its lowest temperature (ideally 170°F/77°C). Place the sticks on a wire rack over a baking sheet to allow air circulation.
Q: Is curing salt absolutely necessary?
A: Yes, if you want shelf-stable snack sticks. The curing salt (Prague Powder #1) prevents bacterial growth and gives the sticks their characteristic tangy flavor. If you omit it, you’ll need to refrigerate your snack sticks and consume them within a week.
Q: How can I tell when my venison snack sticks are done cooking?
A: The most reliable method is using a meat thermometer to check that they’ve reached an internal temperature of 160°F (71°C). Visually, they should be uniform in color and feel firm when squeezed gently.
Final Thoughts
Making your own venison snack sticks might seem intimidating at first, but I promise it’s one of those kitchen projects that delivers tremendous satisfaction. There’s something almost magical about transforming ground venison into professional-quality snack sticks that your family will reach for again and again.
What I love most about this venison snack stick recipe is how it connects us to older traditions of food preservation while creating something that fits perfectly into our modern, busy lives. Whether you’re a hunter looking to make the most of your harvest or simply someone who appreciates knowing exactly what goes into your food, these homemade snack sticks are sure to become a favorite.
I’d love to hear how your snack sticks turn out or any creative flavor variations you discover along the way! Drop a comment below or tag me in your creations on social media. Happy cooking from my farmhouse kitchen to yours!
Print
venison snack stick recipe: How to Make the Best 5 Ingredients
- Total Time: 5 hours 30 minutes
- Yield: 25 snack sticks 1x
Description
Ingredients
For this simple venison snack stick recipe, you’ll only need these 5 ingredients:
-
- 2 pounds ground venison (10-15% fat content)
-
- ¼ cup curing salt (Prague Powder #1)
-
- 2 tablespoons black pepper
-
- 1 tablespoon garlic powder
-
- 1 tablespoon onion powder
Instructions
Step 1: Prepare the Meat Mixture
In a large mixing bowl, combine the ground venison with the curing salt, black pepper, garlic powder, and onion powder. Using clean hands (my preferred method) or a stand mixer with a paddle attachment, mix thoroughly until all the seasonings are evenly distributed throughout the meat.
The key here is thorough mixing – spend at least 5 minutes working the mixture to ensure the curing salt is completely incorporated. This isn’t just for flavor; it’s for food safety too!
Step 2: Let the Mixture Rest and Cure
Transfer the seasoned meat mixture to a large ziplock bag or covered container. Press out as much air as possible and seal tightly. Place in the refrigerator for 24 hours to allow the curing process to work its magic.
This resting period is non-negotiable! The curing salt needs time to properly preserve the meat and develop that characteristic tangy snack stick flavor we all love.
Step 3: Prepare Your Equipment
If using a smoker (my preferred method), preheat to 165°F (74°C). If using an oven, preheat to the lowest setting, ideally around 170°F (77°C).
For forming the sticks, you have several options:
-
- Use a sausage stuffer with 19-21mm casings
-
- Form the meat mixture into thin logs by hand
-
- Press the mixture into a jerky gun if you have one
Step 4: Form the Snack Sticks
Remove the meat mixture from the refrigerator. If using casings, stuff the mixture into the casings according to your stuffer’s instructions, twisting every 6 inches to create individual sticks.
If going the no-casing route, roll the mixture into logs about ½-inch in diameter and 6 inches long. Place them on a wire rack over a baking sheet to catch drippings.
Step 5: Cooking Process
Place your formed sticks in the smoker or oven. If using a smoker, add your favorite wood chips – hickory or apple wood pairs beautifully with venison.
Start with these temperature stages:
-
- Smoke/cook at 165°F (74°C) for 1 hour
-
- Increase temperature to 175°F (79°C) for 1 hour
-
- Raise to 185°F (85°C) for 1 hour
-
- Finally, finish at 195°F (91°C) until the internal temperature reaches 160°F (71°C)
The gradual temperature increase prevents the casings from splitting and allows the meat to cook evenly throughout.
Step 6: Cool and Store
Once cooked, remove the snack sticks and let them cool at room temperature for about an hour. This cooling period is important as it lets the texture set properly.
After cooling, you can store them in airtight containers or vacuum-sealed bags. They’ll keep at room temperature for 1-2 weeks, in the refrigerator for up to a month, or in the freezer for up to 6 months.
- Prep Time: 30 minutes
- Cook Time: 300 minutes
- Category: Snack
- Method: Smoking
- Cuisine: American
Nutrition
- Serving Size: 1 snack stick
- Calories: 85 calories per stick
Keywords: homemade venison snack sticks, venison jerky recipe, wild game recipes, deer meat sticks, smoked venison snack recipe


