Table of Contents
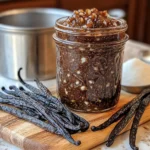
There’s something truly magical about the aroma of real vanilla. Just a whiff takes me back to Sunday mornings in my little yellow farmhouse, with Lila perched on her step stool “helping” me bake while Caleb tries to sneak vanilla extract for a taste (and quickly regrets it!). This homemade vanilla paste recipe changed my baking game completely. After years of paying premium prices for tiny bottles at specialty stores, I finally cracked the code to making this liquid gold at home with just 5 simple ingredients.
If you’ve ever wondered about the difference between vanilla extract and paste, you’re not alone. While extract is wonderful for most recipes, vanilla paste delivers that gorgeous speckled look and more concentrated flavor that makes your desserts look and taste like they came from a professional bakery.
Why You’ll Love This Vanilla Paste Recipe
There’s something incredibly satisfying about creating your own vanilla paste. Beyond the obvious cost savings (have you seen those prices lately?), homemade vanilla paste gives you complete control over ingredients. No artificial additives, no corn syrup – just pure, unadulterated vanilla goodness.
What I love most is the versatility. This vanilla paste recipe works beautifully in everything from delicate desserts to morning pancakes, adding those beautiful vanilla bean specks that signal to everyone that you didn’t cut corners.
Plus, there’s the gift factor. A small jar of homemade vanilla paste tied with twine and a handwritten tag makes for a thoughtful hostess gift that costs a fraction of store-bought versions but delivers so much more heart.
Ingredients
For this vanilla paste recipe, you’ll need just 5 simple ingredients:
- 5-7 whole vanilla beans (Madagascar beans are my preference for their rich flavor)
- 1 cup granulated sugar
- 1/4 cup light corn syrup (or honey as a substitute)
- 1/2 cup water
- 1 tablespoon pure vanilla extract (optional, for depth)
Substitution tips: If you’re avoiding corn syrup, good-quality honey works beautifully though it will add a subtle honey note. For a deeper amber color and caramel notes, brown sugar can replace up to half of the white sugar.
Timing
- Prep time: 15 minutes
- Cook time: 20-25 minutes
- Cooling time: 1 hour
- Total time: About 1 hour 40 minutes
Step-by-Step Instructions
Step 1: Prepare the Vanilla Beans
Using a sharp paring knife, lay each vanilla bean flat on your cutting board and carefully slice lengthwise, opening up to reveal the tiny seeds inside. With the back of your knife, scrape down the length of each pod to collect all those precious vanilla seeds. Don’t discard the pods! They still contain tons of flavor.
Tip: If your vanilla beans are a bit dry, you can soak them in warm water for 10 minutes before splitting to make them more pliable.
Step 2: Create the Syrup Base
In a medium saucepan, combine the granulated sugar, corn syrup (or honey), and water. Heat over medium-low heat, stirring gently until the sugar completely dissolves. Be patient here – you don’t want to rush this step or allow the mixture to boil yet.
Tip: Use a light-colored saucepan if possible, as it makes it easier to monitor the color of your syrup.
Step 3: Add the Vanilla
Once your syrup is clear with no sugar granules remaining, add all the scraped vanilla seeds and the empty pods to the mixture. Bring to a gentle simmer (small bubbles around the edges), then immediately reduce heat to low.
Step 4: Simmer and Infuse
Allow the mixture to simmer very gently for 15-20 minutes. You’ll notice it gradually thickening and turning a beautiful amber color. Stir occasionally to prevent sticking. The kitchen will fill with an absolutely heavenly aroma!
Tip: If the mixture starts to bubble too vigorously, remove from heat briefly to settle it down. You want a gentle infusion, not a rapid boil.
Step 5: Cool and Strain (Optional)
Remove from heat and let cool for about 30 minutes. At this point, you can decide whether to remove the vanilla bean pods or leave them in for continued infusion (I usually leave at least one in each jar). If you prefer a smoother paste without the pods, strain the mixture through a fine mesh sieve.
Step 6: Add Vanilla Extract (Optional)
For an extra punch of flavor, stir in the tablespoon of vanilla extract once the mixture has cooled slightly. This isn’t strictly necessary, but it does add another dimension to the flavor profile.
Step 7: Transfer and Store
Pour your vanilla paste into sterilized glass jars with tight-fitting lids. I love using small 4-ounce jelly jars, which make perfect gifts and keep the paste fresh if you’re not using it all at once.
Cooking Tips
The secret to exceptional vanilla paste is patience. Rushing the process by using high heat will result in a burnt sugar taste rather than that complex vanilla flavor we’re after.
For the deepest flavor, try mixing vanilla bean varieties! While Madagascar beans are my go-to for their classic rich profile, Tahitian beans add floral notes, and Mexican beans bring a slightly spicy undertone. A blend can create a truly signature vanilla paste.
If you find your paste has thickened too much after cooling, simply warm it gently with a teaspoon or two of water until it reaches your desired consistency.
A Little Vanilla Magic
The first time I made this vanilla paste recipe was actually for Lila’s 5th birthday cake. I wanted something special that would make her “princess cake” stand out. Eric walked into the kitchen while I was scraping those tiny seeds and joked that I had lost my mind paying this much attention to an ingredient no one would notice.
But when Lila took that first bite at her party, her eyes widened, and she declared it was “the most vanilla-y cake ever!” Sometimes it’s those little touches that make all the difference. That’s when Eric conceded that maybe those tiny black specks were worth the effort after all.
Nutritional Information
While vanilla paste is typically used in small amounts, it’s worth noting that pure vanilla contains antioxidants and has been studied for its mood-enhancing properties. By making your own, you’re avoiding the preservatives and artificial ingredients often found in commercial versions.
This recipe makes approximately 8 ounces of vanilla paste, with each teaspoon containing about 20 calories, primarily from the sugar content.
Healthier Alternatives
If you’re watching your sugar intake, you can experiment with reducing the sugar to 3/4 cup. The paste won’t be quite as thick but will still deliver beautiful flavor.
For a keto-friendly version, substitute the sugar with allulose or a monk fruit/erythritol blend designed for cooking (not baking blends with fillers). You’ll also need to replace the corn syrup with a sugar-free simple syrup.
Serving Suggestions
Vanilla paste shines brightest when its flavor can take center stage:
- Stir into custards, puddings, and pastry creams (1 teaspoon paste = 1 vanilla bean)
- Fold into whipped cream for an elevated topping
- Add to pancake or waffle batter for a gourmet breakfast
- Incorporate into ice cream bases for those signature specks
- Whisk into buttercream frosting for enhanced visual appeal and flavor
My personal favorite use is in a simple crème brûlée – where the vanilla paste creates beautiful specks against the creamy custard.
Common Mistakes to Avoid
Overheating the mixture: If your syrup boils rapidly, you’ll lose volatile flavor compounds and risk crystallization. Gentle heat is key!
Using old vanilla beans: Vanilla beans should be somewhat pliable, not completely dried out. If yours are too dry, they won’t release their flavor properly.
Undercooking the syrup: If you don’t simmer long enough, your paste won’t thicken properly and may separate during storage.
Varying the recipe too much on first try: While I’m usually all for kitchen improvisation, get comfortable with the basic vanilla paste recipe before introducing major variations.
Storing & Reheating Tips
Your homemade vanilla paste will keep for up to 6 months at room temperature in a cool, dark place. For even longer storage (up to a year), keep it in the refrigerator.
If refrigerated, the paste may thicken considerably. Simply place the jar in warm water for a few minutes or microwave for 5-10 seconds to restore the pourable consistency.
The paste may naturally separate slightly during storage – this isn’t a problem, just stir well before using.
FAQs
Can I use vanilla paste directly in place of vanilla extract?
Yes, but remember that paste is more concentrated. A good rule of thumb is to use about 3/4 teaspoon of paste for each teaspoon of extract called for in recipes.
Is homemade vanilla paste worth the effort compared to store-bought?
Absolutely! Beyond the significant cost savings (often 70-80% less expensive), homemade paste gives you control over ingredients and allows you to customize the flavor intensity.
Can I double or triple this vanilla paste recipe?
Yes, this recipe scales wonderfully. I often make a triple batch during the holiday season for gifts and to stock my own pantry.
Final Thoughts
Creating your own vanilla paste might seem like a small achievement, but there’s something deeply satisfying about incorporating this homemade touch into your baking. Every time you open that jar and get that incredible aroma, you’ll be reminded that some things are worth the extra effort.
This vanilla paste recipe has become one of my kitchen staples, something I reach for whenever I want to elevate a simple dessert into something special. From my little yellow farmhouse to your kitchen, I hope this brings as much joy to your baking as it has to mine!
If you try this recipe, I’d love to hear how it worked in your kitchen. And if you’re looking for more ways to incorporate this liquid gold, check out some of my favorite dessert recipes where vanilla really shines. Happy baking, friends!
vanilla paste recipe: How to create the best 5-ingredient blend
Total Time: 40 minutes
Yield: 8 ounces 1x
Diet: Gluten Free
Description
Ingredients
Scale
For this vanilla paste recipe, you’ll need just 5 simple ingredients:
-
- 5–7 whole vanilla beans (Madagascar beans are my preference for their rich flavor)
-
- 1 cup granulated sugar
-
- 1/4 cup light corn syrup (or honey as a substitute)
-
- 1/2 cup water
-
- 1 tablespoon pure vanilla extract (optional, for depth)
Instructions
Using a sharp paring knife, lay each vanilla bean flat on your cutting board and carefully slice lengthwise, opening up to reveal the tiny seeds inside. With the back of your knife, scrape down the length of each pod to collect all those precious vanilla seeds. Don’t discard the pods! They still contain tons of flavor.
Tip: If your vanilla beans are a bit dry, you can soak them in warm water for 10 minutes before splitting to make them more pliable.
In a medium saucepan, combine the granulated sugar, corn syrup (or honey), and water. Heat over medium-low heat, stirring gently until the sugar completely dissolves. Be patient here – you don’t want to rush this step or allow the mixture to boil yet. Tip: Use a light-colored saucepan if possible, as it makes it easier to monitor the color of your syrup. Once your syrup is clear with no sugar granules remaining, add all the scraped vanilla seeds and the empty pods to the mixture. Bring to a gentle simmer (small bubbles around the edges), then immediately reduce heat to low. Allow the mixture to simmer very gently for 15-20 minutes. You’ll notice it gradually thickening and turning a beautiful amber color. Stir occasionally to prevent sticking. The kitchen will fill with an absolutely heavenly aroma! Tip: If the mixture starts to bubble too vigorously, remove from heat briefly to settle it down. You want a gentle infusion, not a rapid boil. Remove from heat and let cool for about 30 minutes. At this point, you can decide whether to remove the vanilla bean pods or leave them in for continued infusion (I usually leave at least one in each jar). If you prefer a smoother paste without the pods, strain the mixture through a fine mesh sieve. For an extra punch of flavor, stir in the tablespoon of vanilla extract once the mixture has cooled slightly. This isn’t strictly necessary, but it does add another dimension to the flavor profile. Pour your vanilla paste into sterilized glass jars with tight-fitting lids. I love using small 4-ounce jelly jars, which make perfect gifts and keep the paste fresh if you’re not using it all at once.
- Prep Time: 15 minutes
- Cook Time: 25 minutes
- Category: Baking Ingredients
- Method: Stovetop
- Cuisine: American
Nutrition
- Serving Size: 1 teaspoon
- Calories: 20 per teaspoon
Keywords: homemade vanilla paste recipe, vanilla bean paste, how to make vanilla paste, vanilla extract substitute, DIY vanilla paste