Table of Contents
There’s something almost magical about transforming fresh, ripe persimmons into a jewel-toned jelly that captures their unique sweet flavor. This persimmon jelly recipe has become one of my fall favorites, especially when those beautiful orange fruits start appearing at our local farmers market. The first time I made this jelly, my daughter Lila declared it “sunshine in a jar,” and I couldn’t agree more! If you’ve never worked with persimmons before, don’t worry – I’ll guide you through each step of this surprisingly simple process. When autumn arrives and you’re looking for ways to preserve the season, this cornflake candy recipe might be a hit, but nothing quite matches the sophisticated charm of homemade persimmon jelly.
Why You’ll Love This Recipe
There are so many reasons to fall in love with this persimmon jelly recipe! First, it’s the perfect way to use those perfectly ripe persimmons that might otherwise go to waste. The brilliant amber-orange color alone makes this jelly a showstopper on your breakfast table or as a gift for friends and family.
What really sets this persimmon jelly apart is its unique flavor profile – it has notes of honey, apricot, and a hint of cinnamon that store-bought jellies simply can’t match. Plus, the satisfaction of transforming fresh fruit into something preserved that you can enjoy all year round is incredibly rewarding.
This recipe is also surprisingly versatile. Beyond the obvious toast application, this jelly pairs beautifully with cheese boards, works as a glaze for roasted meats, and makes a delightful filling for thumbprint cookies. And if you’re new to canning, this is a wonderfully forgiving recipe to start with!
Ingredients
For 5 (8oz) jars of persimmon jelly, you’ll need:
- 4 pounds of ripe Fuyu persimmons (about 8-10 medium persimmons)
- ¼ cup fresh lemon juice (about 1-2 lemons)
- 1 package (1.75 oz) powdered pectin
- 5 cups granulated sugar
- ½ teaspoon butter (optional, to reduce foaming)
- ½ teaspoon ground cinnamon (optional, but highly recommended)
- ⅛ teaspoon ground cloves (optional)
Ingredient Notes:
- If Fuyu persimmons aren’t available, you can use Hachiya persimmons, but make sure they’re extremely ripe (almost pudding-like consistency).
- Bottled lemon juice can be substituted but fresh gives a brighter flavor.
- Low-sugar pectin can be used with appropriate sugar adjustments.
- For a deeper flavor, consider adding a vanilla bean or a splash of bourbon!
Timing
- Prep Time: 30 minutes
- Cook Time: 25 minutes
- Processing Time: 10 minutes
- Total Time: 1 hour 5 minutes (plus cooling time)
Step-by-Step Instructions
Step 1: Prepare Your Canning Equipment
Before diving into the persimmon prep, get your canning station ready. Wash your jars, lids, and bands in hot, soapy water, then place the jars in your water bath canner or a large pot of water. Bring the water to a simmer (180°F) to keep jars hot until filling time. Place the lids in a small bowl of warm (not boiling) water to soften the sealing compound.
If you’re new to canning, don’t be intimidated! It’s much easier than it looks, and the satisfaction of hearing those lids “ping” as they seal is absolutely worth it.
Step 2: Prepare the Persimmons
Remove the stems and leaves from your persimmons and give them a thorough wash under cool water. For Fuyu persimmons, which are the squat, tomato-shaped variety, cut them into quarters—no need to peel! For Hachiya (the longer, acorn-shaped ones), make sure they’re completely soft before using.
Place the cut persimmons in a large pot with about ½ cup of water and bring to a simmer. Cook for about 15-20 minutes or until the fruit is completely soft.
Step 3: Extract the Juice
Working in batches, transfer the cooked persimmons to a jelly bag or a colander lined with several layers of cheesecloth positioned over a large bowl. Let the juice drip naturally for at least 2 hours or overnight for the clearest jelly.
Olivia’s Tip: Resist the urge to squeeze the bag! While it yields more juice, it can make your jelly cloudy. That said, if clarity isn’t your priority, go ahead and give it a gentle squeeze – I won’t tell anyone!
Step 4: Measure and Prepare the Juice
Measure exactly 4 cups of persimmon juice into a large, non-reactive pot (stainless steel or enamel-coated cast iron works best). If you’re short on juice, you can add a bit of apple juice to reach the full 4 cups.
Add the lemon juice and pectin, stirring until the pectin dissolves. This is when I add the optional spices as well – the cinnamon and cloves give the jelly a wonderful warmth that perfectly complements fall and winter breakfasts.
Step 5: Bring to a Boil
Turn the heat to high and bring the mixture to a full rolling boil (one that cannot be stirred down). Add the butter if using – this helps reduce foaming and makes skimming easier.
Step 6: Add Sugar and Boil Again
Add all of the sugar at once, stirring constantly to dissolve. Return the mixture to a full rolling boil and boil hard for exactly 1 minute, stirring continuously.
Olivia’s Tip: This is where precision matters! Set a timer for that 1-minute boil – too short, and your jelly won’t set; too long, and it might become too stiff.
Step 7: Check the Set
Remove from heat and skim off any foam that may have formed on top. To test if the jelly will set properly, place a small spoonful on a chilled plate and put it in the freezer for a minute. If it wrinkles when you push it with your finger, it’s ready. If not, boil for another minute and test again.
Step 8: Fill the Jars
Using a ladle and funnel, carefully pour the hot jelly into the prepared hot jars, leaving ¼-inch headspace. Wipe the rims clean with a damp cloth, place the lids on the jars, and screw on the bands until fingertip tight.
Step 9: Process the Jars
Place the filled jars in your water bath canner or large pot, ensuring they’re covered by at least 1-2 inches of water. Bring to a boil and process for 10 minutes (adjust time for elevation if necessary).
Step 10: Cool and Store
Using jar lifters, carefully remove the processed jars and place them on a towel-lined countertop. Leave undisturbed for 24 hours. You’ll hear satisfying “pings” as the jars seal. After 24 hours, check the seals by pressing on the center of each lid – it should not flex. Store properly sealed jars in a cool, dark place for up to a year. Refrigerate any unsealed jars and use within 3 weeks.
Cooking Tips
The art of perfect persimmon jelly comes with a few insider secrets I’ve learned through trial and error:
For the clearest, most jewel-like jelly, use slightly underripe Fuyu persimmons mixed with fully ripe ones. This balances flavor with natural pectin content.
If your persimmons aren’t quite ripe when you get them home, place them in a paper bag with a banana or apple to speed up ripening.
Want to ensure your jelly sets perfectly? Add one tart, green apple (chopped with peel) while cooking your persimmons – it adds natural pectin!
For a gorgeous gift presentation, try using decorative jars and adding a cinnamon stick to each jar before filling. The cinnamon infuses slowly over time and looks beautiful.
If you like a spicier profile, try adding a small knob of grated ginger or a split vanilla bean to the cooking persimmons. The cherries in the snow recipe offers a similar opportunity for creative flavor layering.
Personal Story
Making persimmon jelly has become something of a fall tradition in our little yellow farmhouse. It started three years ago when our elderly neighbor, Mr. Peterson, showed up at our door with a basket overflowing with persimmons from his 40-year-old tree.
“These were my late wife’s favorite,” he told me, “but I can’t use them all. She used to make the most beautiful jelly…”
I had never worked with persimmons before, but something about the wistful look in his eyes made me determined to try. After some research and a few phone calls to my own grandmother (the queen of preserves), I developed this recipe.
The following week, I brought Mr. Peterson a jar of the finished jelly. The look on his face when he tasted it – that mixture of surprise, delight, and memory – is why I continue to make this recipe every fall. Food connects us not just to each other, but to our shared stories and histories. Every time I make this persimmon jelly recipe, I think of Mrs. Peterson, a woman I never met, but whose legacy lives on through her husband’s persimmon tree and now, through my family’s fall traditions.
Nutritional Information
While jelly isn’t typically considered a health food due to its sugar content, persimmon jelly does offer some nutritional benefits worth noting:
- Persimmons are naturally high in vitamins A and C, which support immune function and skin health.
- They also contain significant amounts of manganese, a mineral that helps with bone formation and metabolism.
- The fruit is rich in antioxidants, particularly beta-carotene, which gives it that beautiful orange color.
- A single tablespoon serving of this persimmon jelly contains approximately:
- Calories: 50
- Carbohydrates: 13g
- Protein: 0g
- Fat: 0g
- Fiber: 0g
- Sugar: 13g
Healthier Alternatives
If you’re watching your sugar intake but still want to enjoy the unique flavor of persimmon jelly, here are some modifications to consider:
- Replace up to half the sugar with a monk fruit/erythritol blend designed for canning (look for products specifically made for preserves).
- Use low-sugar pectin and follow the package directions for reduced sugar recipes.
- For a completely different approach, try making persimmon butter instead of jelly – it requires less sugar and has a more concentrated fruit flavor.
- For a quick, no-added-sugar option, simply puree ripe persimmons and freeze in ice cube trays. These can be added to smoothies, oatmeal, or yogurt for a burst of persimmon flavor.
Serving Suggestions
Persimmon jelly is wonderfully versatile and goes far beyond the breakfast table:
- Spread on warm, buttered Albers cornbread for a delightful sweet-savory combination
- Use as a glaze for roasted pork loin or chicken during the last 15 minutes of cooking
- Warm slightly and drizzle over vanilla ice cream or pound cake
- Pair with sharp cheddar or brie on a cheese board
- Stir a spoonful into plain yogurt for a sweetened breakfast
- Use as a filling for thumbprint cookies or between layer cakes
- Swirl into oatmeal or cream of wheat for a fruity breakfast
- Mix a tablespoon with olive oil, vinegar, and dijon for a unique salad dressing
Common Mistakes to Avoid
Even the most experienced home canners can run into issues. Here are some pitfalls to watch out for when making persimmon jelly:
Using overripe persimmons: While Hachiya persimmons need to be completely soft before eating, using overly mushy Fuyu persimmons can result in a jelly with less defined flavor and pectin.
Skipping the lemon juice: The acidity in lemon juice is crucial not only for flavor but for safe canning and proper jelly set. Don’t omit it!
Altering the sugar amount: Sugar does more than sweeten – it’s vital for preservation and texture. If you want a lower-sugar version, use a pectin specifically designed for low-sugar recipes.
Rushing the dripping process: Patience yields clearer, more beautiful jelly. Let gravity do the work.
Inaccurate measuring: Jelly making is part science – using exact measurements ensures proper setting.
Processing shortcuts: Proper water bath processing is essential for food safety when storing jelly at room temperature.
Storing & Reheating Tips
Proper storage ensures your persimmon jelly maintains its quality and remains safe to eat:
Properly sealed and processed jars can be stored in a cool, dark pantry for up to 1 year. Once opened, refrigerate and use within 3 weeks.
If you notice any jars that haven’t sealed properly (the lid pops when pressed), refrigerate and use these first.
For gifting jars that will be used within a few weeks, you can skip the water bath canning process and simply refrigerate them – just be sure to let recipients know they need refrigeration!
If your jelly sets too firmly over time, gently warming the jar in a bowl of warm water can help make it spreadable again.
Freezer method: If canning seems intimidating, you can make freezer jelly instead! Use freezer-safe containers, leave ½-inch headspace, and freeze for up to 6 months.
FAQs
Q: Can I use dried persimmons for this recipe?
A: Fresh is best for this persimmon jelly recipe, but if you only have dried persimmons, you can rehydrate them in hot water for several hours before proceeding. The flavor profile will be different – deeper and more concentrated – but still delicious!
Q: My jelly didn’t set properly. What went wrong?
A: Several factors affect setting: insufficient acid, improper measuring, not reaching a full rolling boil, or using overripe fruit with less natural pectin. If your jelly is too runny after 24 hours, you can reprocess it with additional pectin.
Q: Are Fuyu or Hachiya persimmons better for jelly?
A: Both work well but require different handling. Fuyu persimmons can be used when firm-ripe, while Hachiya must be completely soft (almost pudding-like) or they’ll impart an astringent taste to your jelly.
Final Thoughts
There’s something profoundly satisfying about transforming seasonal fruits into preserves that can be enjoyed throughout the year. This persimmon jelly recipe isn’t just about creating something delicious – it’s about capturing a moment in time, a season, a flavor that can transport you back to autumn days with just one taste.
What I love most about this persimmon jelly is how it introduces many people to a fruit they might otherwise overlook. Persimmons have such a unique, honey-like sweetness that deserves more attention in our kitchens. Whether you’re spreading this jelly on your morning toast, using it as a glaze for holiday meats, or giving jars as heartfelt homemade gifts, I hope it brings as much joy to your home as it has to mine.
I’d love to hear how your persimmon jelly turns out! Drop me a comment below, or tag me in your jelly-making adventures on social media. If persimmon season has passed but you’re still in the mood for preserving, my butter toffee pretzels recipe might satisfy your sweet-making cravings until next fall’s persimmon harvest arrives.
Happy preserving from my kitchen to yours!
Print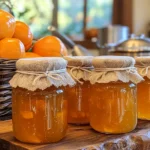
persimmon jelly recipe: How to Make 5 Delicious Jars at Home
- Total Time: 55 minutes
- Yield: 5 jars 1x
- Diet: Vegetarian
Description
Ingredients
For 5 (8oz) jars of persimmon jelly, you’ll need:
- 4 pounds of ripe Fuyu persimmons (about 8–10 medium persimmons)
- ¼ cup fresh lemon juice (about 1–2 lemons)
- 1 package (1.75 oz) powdered pectin
- 5 cups granulated sugar
- ½ teaspoon butter (optional, to reduce foaming)
- ½ teaspoon ground cinnamon (optional, but highly recommended)
- ⅛ teaspoon ground cloves (optional)
Instructions
Before diving into the persimmon prep, get your canning station ready. Wash your jars, lids, and bands in hot, soapy water, then place the jars in your water bath canner or a large pot of water. Bring the water to a simmer (180°F) to keep jars hot until filling time. Place the lids in a small bowl of warm (not boiling) water to soften the sealing compound.
If you’re new to canning, don’t be intimidated! It’s much easier than it looks, and the satisfaction of hearing those lids “ping” as they seal is absolutely worth it.
Remove the stems and leaves from your persimmons and give them a thorough wash under cool water. For Fuyu persimmons, which are the squat, tomato-shaped variety, cut them into quarters—no need to peel! For Hachiya (the longer, acorn-shaped ones), make sure they’re completely soft before using.
Place the cut persimmons in a large pot with about ½ cup of water and bring to a simmer. Cook for about 15-20 minutes or until the fruit is completely soft.
Working in batches, transfer the cooked persimmons to a jelly bag or a colander lined with several layers of cheesecloth positioned over a large bowl. Let the juice drip naturally for at least 2 hours or overnight for the clearest jelly.
Olivia’s Tip: Resist the urge to squeeze the bag! While it yields more juice, it can make your jelly cloudy. That said, if clarity isn’t your priority, go ahead and give it a gentle squeeze – I won’t tell anyone!
Measure exactly 4 cups of persimmon juice into a large, non-reactive pot (stainless steel or enamel-coated cast iron works best). If you’re short on juice, you can add a bit of apple juice to reach the full 4 cups.
Add the lemon juice and pectin, stirring until the pectin dissolves. This is when I add the optional spices as well – the cinnamon and cloves give the jelly a wonderful warmth that perfectly complements fall and winter breakfasts.
Turn the heat to high and bring the mixture to a full rolling boil (one that cannot be stirred down). Add the butter if using – this helps reduce foaming and makes skimming easier.
Add all of the sugar at once, stirring constantly to dissolve. Return the mixture to a full rolling boil and boil hard for exactly 1 minute, stirring continuously.
Olivia’s Tip: This is where precision matters! Set a timer for that 1-minute boil – too short, and your jelly won’t set; too long, and it might become too stiff.
Remove from heat and skim off any foam that may have formed on top. To test if the jelly will set properly, place a small spoonful on a chilled plate and put it in the freezer for a minute. If it wrinkles when you push it with your finger, it’s ready. If not, boil for another minute and test again.
Using a ladle and funnel, carefully pour the hot jelly into the prepared hot jars, leaving ¼-inch headspace. Wipe the rims clean with a damp cloth, place the lids on the jars, and screw on the bands until fingertip tight.
Place the filled jars in your water bath canner or large pot, ensuring they’re covered by at least 1-2 inches of water. Bring to a boil and process for 10 minutes (adjust time for elevation if necessary).
Using jar lifters, carefully remove the processed jars and place them on a towel-lined countertop. Leave undisturbed for 24 hours. You’ll hear satisfying “pings” as the jars seal. After 24 hours, check the seals by pressing on the center of each lid – it should not flex. Store properly sealed jars in a cool, dark place for up to a year. Refrigerate any unsealed jars and use within 3 weeks.
- Prep Time: 30 minutes
- Cook Time: 25 minutes
- Category: Preserves
- Method: Canning
- Cuisine: American
Nutrition
- Serving Size: 1 tablespoon
- Calories: 50 per tablespoon
Keywords: persimmon jelly recipe, homemade fruit preserves, canning persimmons, autumn preserves, persimmon preserves