Table of Contents
There’s something magical about the scent of summer fruits bubbling away on the stove. That sweet, tangy aroma that fills every corner of your home, promising delicious spoonfuls of homemade goodness in the days to come. My apricot pineapple jam recipe brings those summer feelings right to your kitchen, no matter what season it is. This jam has become a staple in our little yellow farmhouse here in Asheville, where my kiddos line up with spoons ready whenever the canning jars come out.
Last weekend, while my daughter Lila was “helping” by licking the wooden spoon when I wasn’t looking, I realized how this simple apricot pineapple jam recipe has become part of our family story. It’s the jam that convinced my husband Eric that homemade preserves are worth the effort, the jam that my 3-year-old Caleb requests on his PB&J (though half ends up on his cheeks), and the jam that neighbors now expect as holiday gifts.
Why You’ll Love This Apricot Pineapple Jam Recipe
This apricot pineapple jam recipe isn’t just delicious—it’s a game-changer for both beginner and experienced canners alike. Here’s what makes it special:
- Foolproof process: Even if you’ve never made jam before, you can nail this recipe on your first try
- Perfect balance: The sweet tropical pineapple complements the slightly tart apricots beautifully
- Versatile use: Works on toast, in thumbprint cookies, as a glaze for meats, or straight from the jar (I won’t tell!)
- Gift-worthy: These pretty golden jars make beautiful homemade gifts that friends will actually use
- No specialty ingredients: Everything can be found at your regular grocery store
- Make-ahead friendly: Lasts up to a year in your pantry, bringing sunshine to winter mornings
Looking for another vibrant fruit spread? Try our Cherries in the Snow Recipe for a creamy dessert with nostalgic charm
Ingredients
For this sunshine-in-a-jar apricot pineapple jam recipe, you’ll need:
- 4 cups fresh apricots, pitted and chopped (about 2 pounds whole)
- 2 cups fresh pineapple, cored and finely chopped (about half a medium pineapple)
- 4 cups granulated sugar
- 2 tablespoons fresh lemon juice
- 1/2 teaspoon unsalted butter (reduces foaming)
- 1 box (1.75 oz) powdered fruit pectin
Ingredient Notes:
- If fresh apricots aren’t in season, you can use frozen—just thaw and drain them first
- In a pinch, canned pineapple in juice (not syrup) works too—just drain well and reduce sugar by 1/4 cup
- The tiny bit of butter is my grandma’s secret for reducing foam—totally optional but super helpful
Timing
- Prep Time: 30 minutes (pitting apricots is the most time-consuming part)
- Cook Time: 25 minutes
- Processing Time: 10 minutes
- Total Time: 1 hour 5 minutes
- Yield: About 6-7 half-pint (8 oz) jars
This apricot pineapple jam recipe takes less time than most traditional jam recipes that require overnight macerating. You’ll have finished jars within about an hour!
Step-by-Step Instructions
Step 1: Prepare Your Canning Equipment
Before diving into the fruit preparation, get your canning setup ready. Fill your water bath canner about halfway with water and begin heating it. Wash your jars with hot, soapy water, rinse well, and keep them warm. I place mine on a cookie sheet in an oven set to 200°F. Place the lids in a small saucepan with water and heat them gently (but don’t boil).
Step 2: Prepare The Fruit
Wash, pit, and chop your apricots into small pieces. You want them to be about 1/4 to 1/2 inch in size. For the pineapple, remove the core and chop it into even smaller pieces—almost minced. The smaller your pineapple chunks, the more evenly they’ll distribute through your apricot pineapple jam recipe.
I’ve learned from experience (and a few chunky batches) that taking extra time during this prep stage makes for the perfect texture in your final jam!
Step 3: Cook The Fruit Mixture
In a large, heavy-bottomed pot (I use my beloved 6-quart Dutch oven), combine the prepared apricots, pineapple, lemon juice, and butter. Measure your sugar into a separate bowl but don’t add it yet.
Sprinkle the pectin over the fruit mixture and stir to combine. Bring this mixture to a full rolling boil over medium-high heat, stirring constantly to prevent scorching.
Step 4: Add Sugar And Bring To A Boil
Once your fruit mixture has reached a full boil, add all the sugar at once, stirring quickly to dissolve. The mixture will cool down temporarily, but keep stirring and bring it back to a full rolling boil (a boil that doesn’t stop when stirred).
Once it returns to a full rolling boil, set your timer for exactly 1 minute. This timing is crucial for getting the perfect set in your pineapple apricot jam recipe!
Step 5: Test The Gel
After the 1-minute hard boil, remove your pot from the heat. Use a metal spoon to gently skim off any foam from the surface. To test if your jam will set, place a small plate in the freezer before you start cooking. Drop a small spoonful of hot jam onto the cold plate, wait 30 seconds, then push it with your finger. If it wrinkles slightly, it’s ready! If the mixture remains runny, continue boiling for another minute, then test again.
Step 6: Fill The Jars
Using a ladle and funnel, carefully fill the hot jars with your apricot pineapple jam, leaving 1/4 inch of headspace. Run a plastic or wooden tool (never metal) around the inside of each jar to remove air bubbles. Carefully wipe the jar rims with a clean, damp cloth to promote a proper seal.
Step 7: Process The Jars
Place the lids on the jars and screw on the bands until fingertip tight. Using a jar lifter, carefully lower the filled jars into your water bath canner. Make sure they’re covered by at least 1 inch of water. Cover and bring to a gentle boil. Process half-pint jars for 10 minutes (adjust for altitude if necessary).
Step 8: Cool And Store
After processing, carefully remove jars and place them on a towel-lined counter where they can rest undisturbed for 24 hours. You’ll hear the satisfying “ping” as each jar seals! After 24 hours, check the seals, label with date and name, and store in a cool, dark place for up to a year.
Cooking Tips
After making this apricot pineapple jam recipe dozens of times, I’ve gathered some wisdom to share:
- Don’t reduce the sugar: It’s not just for sweetness—it’s essential for preservation and setting
- Taste test your fruit: If your apricots are very tart, you can add an extra 1/4 cup of sugar
- Watch like a hawk: Jam can go from “almost ready” to “burnt mess” in minutes if you’re not careful
- Consistency check: This jam should be a bit looser than traditional apricot jam—that’s perfectly normal! For a completely different texture but equally craveable treat, don’t miss this Deliciously Irresistible Coconut Pecan Cookie Recipe—chewy, nutty, and perfect for sweet lovers
- Mash to preference: Use a potato masher before adding pectin if you prefer a smoother consistency
- Jar tip: For gifting, try the cute 4 oz jars—people love them for sampling without commitment
Personal Story
The first time I made this apricot pineapple jam recipe was actually a happy accident. Five years ago, I’d planned to make straight apricot jam but realized halfway through prep that I didn’t have enough fruit. With a counter full of pitted apricots and no time to run to the store (Lila was a toddler napping upstairs), I frantically searched the kitchen and found a ripe pineapple I’d bought for smoothies.
Desperate times, right? I chopped it up, tossed it in, and hoped for the best. That “mistake” batch became so popular with friends and family that I was basically required to make it every summer thereafter! Sometimes our kitchen scrambles lead to the best discoveries. As my grandma would say, “necessity is the mother of delicious invention.” Or something like that.
Nutritional Information
While this apricot pineapple jam recipe is definitely a treat, it does have some nutritional benefits worth noting:
- Calories: Approximately 45 calories per tablespoon
- Fruit Benefits: Contains vitamin C, vitamin A, and dietary fiber from both fruits
- Lower Sugar Option: For a reduced-sugar version, you can use low-sugar pectin and reduce sugar to 2 1/2 cups, though it will affect shelf life and texture
Compared to store-bought jams, this homemade version has no artificial preservatives, colors, or corn syrup, making it a more natural choice for your family’s breakfast table.
Healthier Alternatives
If you’re watching your sugar intake but still want to enjoy this delicious pineapple apricot jam recipe, here are some modifications:
- Low-sugar pectin: Use a specific low-sugar pectin and follow package directions for reduced sugar
- Natural sweeteners: Replace up to 1 cup of the sugar with honey (though this changes flavor and texture)
- Smaller portions: Use as a garnish rather than slathering it on—a little goes a long way!
- Chia jam version: For a refrigerator version, reduce sugar by half and add 3 tablespoons chia seeds to thicken instead of pectin (will only keep about 2 weeks)
Remember that any significant changes will affect both shelf stability and texture, so adjust expectations accordingly.
Serving Suggestions
This apricot pineapple jam recipe shines in so many ways beyond just toast! Here are my family’s favorite serving ideas:
- Swirl a spoonful into plain Greek yogurt with some granola
- Use as a glaze for ham or pork tenderloin (seriously amazing!)
- Spoon over vanilla ice cream for an instant fancy dessert
- Fill thumbprint cookies or use as a layer in bar cookies
- Spread between vanilla cake layers with cream cheese frosting
- Mix a tablespoon into vinaigrette for a sweet-tangy salad dressing
- Use as a fancy cheese board accompaniment alongside brie or goat cheese
My personal favorite? A slice of buttered sourdough toast with a generous spoonful of this sunny jam and a cup of coffee—simple pleasures are often the best!
Common Mistakes to Avoid
Even experienced canners can hit a few bumps when making jam. Here’s how to avoid the most common pitfalls with this pineapple apricot jam recipe:
- Changing proportions: Preserve recipes are scientific formulas—adjusting ratios can prevent proper setting and preservation
- Doubling the batch: This often prevents proper setting; make multiple single batches instead
- Undercooking: Not reaching a full rolling boil means pectin won’t activate properly
- Rushing the process: Taking shortcuts with preparation leads to uneven cooking and poor results
- Using overripe fruit: While fine for eating, too-soft fruit makes runny jam with less flavor definition
Remember, jam-making is part science, part art. Your first batch might not be perfect, but it will still be delicious!
Storing & Reheating Tips
Properly stored, your apricot pineapple jam recipe yields will last for:
- Sealed jars: 12-18 months in a cool, dark pantry
- Opened jars: 3-4 weeks in the refrigerator
- Freezer jam option: If you prefer not to process in a water bath, leave 1/2 inch headspace and freeze for up to 6 months
For gifting, I like to wrap my jars in cute fabric secured with twine and attach a handwritten tag with storage instructions. It’s those little touches that make homemade gifts so special.
If you notice any jars with bulging lids, mold, or off smells, always discard them without tasting.
FAQs
Can I make this apricot pineapple jam recipe with canned fruit?
Yes, you can! If fresh apricots aren’t available, use 4 cups of drained canned apricots (packed in juice, not syrup). For the pineapple, 2 cups of well-drained crushed pineapple works perfectly. Reduce your sugar by about 1/4 cup since canned fruits are already slightly sweetened.
Why did my pineapple apricot jam recipe not set properly?
The most common reasons for jam not setting are: not reaching a full rolling boil, not boiling for the full minute after adding sugar, using overripe fruit (which has less natural pectin), or inaccurate measurements. Remember that this particular jam sets a bit softer than traditional jams—that’s part of its charm!
Can I use this apricot pineapple jam recipe for a cake filling?
Absolutely! This jam makes an excellent cake filling, but I recommend using it between layers rather than as a topping, as it can be a bit too heavy for delicate frostings. For the best results when using in baked goods, choose a batch that has set slightly firmer.
Final Thoughts
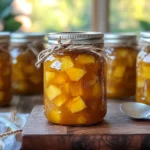
There’s something so satisfying about lining up jars of homemade apricot pineapple jam on your pantry shelf—like storing away little jars of sunshine for darker days. This recipe has brought so much joy to our family table, from winter morning breakfasts to holiday gift baskets.
What I love most about this apricot pineapple jam recipe is how it connects us—to the changing seasons, to the tradition of preserving, and to each other as we gather around good food. There’s love in those jars, along with apricots and pineapple.
I hope you’ll try this recipe and make it part of your family’s story too. When you do, I’d love to hear how it turned out and how you enjoyed it! There’s nothing that makes me happier than knowing my recipes have found a home in your kitchen.
How to Make Apricot Pineapple Jam Recipe Your Family Will Love
Total Time: 45 minutes
Yield: 6 half-pint (8 oz) jars 1x
Description
Ingredients
Scale
For this sunshine-in-a-jar apricot pineapple jam recipe, you’ll need:
- 4 cups fresh apricots, pitted and chopped (about 2 pounds whole)
- 2 cups fresh pineapple, cored and finely chopped (about half a medium pineapple)
- 4 cups granulated sugar
- 2 tablespoons fresh lemon juice
- 1/2 teaspoon unsalted butter (reduces foaming)
- 1 box (1.75 oz) powdered fruit pectin
Instructions
Before diving into the fruit preparation, get your canning setup ready. Fill your water bath canner about halfway with water and begin heating it. Wash your jars with hot, soapy water, rinse well, and keep them warm. I place mine on a cookie sheet in an oven set to 200°F. Place the lids in a small saucepan with water and heat them gently (but don’t boil).
Wash, pit, and chop your apricots into small pieces. You want them to be about 1/4 to 1/2 inch in size. For the pineapple, remove the core and chop it into even smaller pieces—almost minced. The smaller your pineapple chunks, the more evenly they’ll distribute through your apricot pineapple jam recipe. I’ve learned from experience (and a few chunky batches) that taking extra time during this prep stage makes for the perfect texture in your final jam! In a large, heavy-bottomed pot (I use my beloved 6-quart Dutch oven), combine the prepared apricots, pineapple, lemon juice, and butter. Measure your sugar into a separate bowl but don’t add it yet. Sprinkle the pectin over the fruit mixture and stir to combine. Bring this mixture to a full rolling boil over medium-high heat, stirring constantly to prevent scorching. Once your fruit mixture has reached a full boil, add all the sugar at once, stirring quickly to dissolve. The mixture will cool down temporarily, but keep stirring and bring it back to a full rolling boil (a boil that doesn’t stop when stirred). Once it returns to a full rolling boil, set your timer for exactly 1 minute. This timing is crucial for getting the perfect set in your pineapple apricot jam recipe! After the 1-minute hard boil, remove your pot from the heat. Skim off any foam with a metal spoon. To test if your jam will set, place a small plate in the freezer before you start cooking. Drop a small spoonful of hot jam onto the cold plate, wait 30 seconds, then push it with your finger. If it wrinkles slightly, it’s ready! If it’s still runny, boil for another minute and test again. Using a ladle and funnel, carefully fill the hot jars with your apricot pineapple jam, leaving 1/4 inch of headspace. Run a plastic or wooden tool (never metal) around the inside of each jar to remove air bubbles. Wipe the rims with a clean, damp cloth to ensure a good seal. Place the lids on the jars and screw on the bands until fingertip tight. Using a jar lifter, carefully lower the filled jars into your water bath canner. Make sure they’re covered by at least 1 inch of water. Cover and bring to a gentle boil. Process half-pint jars for 10 minutes (adjust for altitude if necessary). After processing, carefully remove jars and place them on a towel-lined counter where they can rest undisturbed for 24 hours. You’ll hear the satisfying “ping” as each jar seals! After 24 hours, check the seals, label with date and name, and store in a cool, dark place for up to a year.
- Prep Time: 30 minutes
- Cook Time: 15 minutes
- Category: Jams
- Method: Water Bath Canning
- Cuisine: American
Nutrition
- Serving Size: 1 tablespoon
- Calories: 45
Keywords: apricot pineapple jam recipe, homemade fruit jam, canning jam, pineapple apricot jam, summer jam recipe