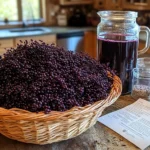
Description
Ingredients
For your basic elderberry wine recipe, you’ll need:
- 3 pounds fresh elderberries (or 1.5 pounds dried)
- 2.5 pounds granulated sugar
- 1 gallon filtered water
- 2 teaspoons acid blend (available at brewing supply stores)
- 1 teaspoon yeast nutrient
- 1 Campden tablet, crushed
- 1 packet wine yeast (I recommend Red Star Premier Rouge or Lalvin EC-1118)
- 1 teaspoon pectic enzyme
Equipment needed:
- 1-gallon glass fermenting vessel (carboy)
- Airlock and bung
- Large pot for boiling
- Straining bag
- Sanitizing solution
- Funnel
- Rubber tubing for siphoning
- Wine bottles and corks (for bottling)
Instructions
First, if using fresh elderberries, remove all stems carefully. The stems contain compounds that can make your wine bitter or even cause stomach upset. This is a great activity to do outside on the porch with a cup of tea and a good podcast. My daughter Lila loves to help with this step, and we’ve had some of our best conversations while de-stemming berries together.
Once cleaned, gently rinse your berries in cold water. If using dried berries, you can skip directly to the next step.
In a large pot, bring half your water (about 2 quarts) to a boil. While it’s heating, place your elderberries in a mesh brewing bag and gently crush them to release their juices. When the water reaches a gentle boil, turn off the heat and submerge your bag of berries in the water.
Add your sugar and stir until completely dissolved. Cover the pot and let it steep for about 30 minutes.
After steeping, remove the bag of berries (squeeze gently to extract remaining juice) and add the remaining cold water to bring the temperature down to about 70°F (21°C).
Add the acid blend, yeast nutrient, and crushed Campden tablet. Stir well, then transfer to your sanitized fermenting vessel. Cover with a cloth and let sit for 24 hours. This waiting period allows the Campden tablet to dissipate, which otherwise might kill your yeast.
After 24 hours, add the pectic enzyme and stir. Wait another 12 hours, then add your wine yeast according to the package instructions. Typically, this involves rehydrating the yeast in a small amount of warm water before adding it to your must.
Secure your airlock and bung to the fermenting vessel. Within 24-48 hours, you should see bubbling activity in the airlock, indicating fermentation has begun!
Keep your fermenting vessel in a location with a consistent temperature between 65-75°F (18-24°C). I keep mine in our pantry, where Eric knows not to disturb my “wine experiment corner.”
After 7-10 days, when the most vigorous bubbling has subsided, it’s time to transfer your wine to secondary fermentation.
Using sanitized equipment, siphon (rack) your wine into another sanitized vessel, leaving behind the sediment at the bottom. This process, called racking, helps clarify your wine.
Attach the airlock again and move the vessel to a cool, dark location for 2-3 months. During this time, you’ll want to rack the wine 1-2 more times whenever significant sediment builds up.
Once your wine has cleared and fermentation has completely stopped (no bubbles in the airlock for at least two weeks), it’s time to bottle. Before bottling, you may want to stabilize your wine with another crushed Campden tablet and, if desired, sweeten to taste.
Siphon into sanitized wine bottles and cork immediately. Label with the date and type of wine – trust me, once you start making different batches, you’ll appreciate knowing which is which!
Store your bottles in a cool, dark place. While you could technically drink your elderberry wine after a month or two, patience truly rewards here. I find that 6-12 months of aging creates a dramatically better flavor profile.
- Prep Time: 60 minutes
- Cook Time: 0 minutes
- Category: Beverages
- Method: Fermentation
- Cuisine: Home Brewing
Nutrition
- Serving Size: 5 oz
- Calories: 150
Keywords: elderberry wine recipe, homemade elderberry wine, elderberry fermentation, fruit wine making, elderberry port recipe
