Table of Contents
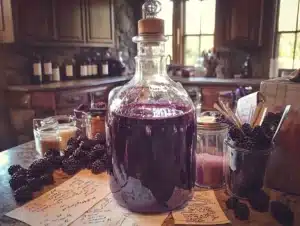
There’s something almost magical about transforming those tiny, deep purple berries into a bottle of homemade elderberry wine. Standing in my little yellow farmhouse kitchen, watching the afternoon sun stream through the window as I stir my latest batch, I’m reminded why I fell in love with this elderberry wine recipe years ago. If you’ve ever driven past wild elderberry bushes and wondered what treasures they might hold, or if you’re simply looking to try your hand at homemade wine-making, you’re in exactly the right place.
Making elderberry wine at home connects us to a tradition that spans generations – something I think about often when preparing my family’s favorite meals. My grandmother taught me that the best recipes aren’t just about the ingredients; they’re about patience, process, and the stories we create along the way.
Why You’ll Love This Elderberry Wine Recipe
This elderberry wine recipe isn’t just about creating a delicious beverage (though it certainly does that!). It’s about embracing a seasonal rhythm, connecting with nature’s bounty, and experiencing the satisfaction that comes from crafting something truly special with your own hands.
What makes this recipe particularly wonderful:
- Adaptable: I’m sharing 5 unique variations so you can find your perfect elderberry wine style
- Approachable: No fancy equipment required to get started
- Seasonal: Makes the most of elderberry season (late summer to early fall)
- Gift-worthy: Creates bottles perfect for holiday giving or special celebrations
- Customizable: Easy to adjust sweetness and flavor profiles to your preference
I’ve broken down this elderberry wine recipe into manageable steps that even first-time wine makers can follow with confidence. Let’s get started!
Basic Elderberry Wine Ingredients
For your basic elderberry wine recipe, you’ll need:
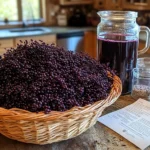
- 3 pounds fresh elderberries (or 1.5 pounds dried)
- 2.5 pounds granulated sugar
- 1 gallon filtered water
- 2 teaspoons acid blend (available at brewing supply stores)
- 1 teaspoon yeast nutrient
- 1 Campden tablet, crushed
- 1 packet wine yeast (I recommend Red Star Premier Rouge or Lalvin EC-1118)
- 1 teaspoon pectic enzyme
Equipment needed:
- 1-gallon glass fermenting vessel (carboy)
- Airlock and bung
- Large pot for boiling
- Straining bag
- Sanitizing solution
- Funnel
- Rubber tubing for siphoning
- Wine bottles and corks (for bottling)
Timing
- Preparation Time: 1 hour
- Primary Fermentation: 7-10 days
- Secondary Fermentation: 2-3 months
- Aging: 6-12 months (the longer, the better!)
- Total Time: 8-16 months from start to finish
I know that seems like a long time, but trust me – the patience pays off! While you’re waiting, you might enjoy trying my blueberry cottage cheese breakfast bake recipe for a more immediate berry fix.
Basic Elderberry Wine Recipe Instructions
Step 1: Preparing Your Berries
First, if using fresh elderberries, remove all stems carefully. The stems contain compounds that can make your wine bitter or even cause stomach upset. This is a great activity to do outside on the porch with a cup of tea and a good podcast. My daughter Lila loves to help with this step, and we’ve had some of our best conversations while de-stemming berries together.
Once cleaned, gently rinse your berries in cold water. If using dried berries, you can skip directly to the next step.
Step 2: Creating Your Must
In a large pot, bring half your water (about 2 quarts) to a boil. While it’s heating, place your elderberries in a mesh brewing bag and gently crush them to release their juices. When the water reaches a gentle boil, turn off the heat and submerge your bag of berries in the water.
Add your sugar and stir until completely dissolved. Cover the pot and let it steep for about 30 minutes.
Step 3: Preparing For Fermentation
After steeping, remove the bag of berries (squeeze gently to extract remaining juice) and add the remaining cold water to bring the temperature down to about 70°F (21°C).
Add the acid blend, yeast nutrient, and crushed Campden tablet. Stir well, then transfer to your sanitized fermenting vessel. Cover with a cloth and let sit for 24 hours. This waiting period allows the Campden tablet to dissipate, which otherwise might kill your yeast.
Step 4: Starting Fermentation
After 24 hours, add the pectic enzyme and stir. Wait another 12 hours, then add your wine yeast according to the package instructions. Typically, this involves rehydrating the yeast in a small amount of warm water before adding it to your must.
Secure your airlock and bung to the fermenting vessel. Within 24-48 hours, you should see bubbling activity in the airlock, indicating fermentation has begun!
Step 5: Primary Fermentation
Keep your fermenting vessel in a location with a consistent temperature between 65-75°F (18-24°C). I keep mine in our pantry, where Eric knows not to disturb my “wine experiment corner.”
After 7-10 days, when the most vigorous bubbling has subsided, it’s time to transfer your wine to secondary fermentation.
Step 6: Secondary Fermentation
Using sanitized equipment, siphon (rack) your wine into another sanitized vessel, leaving behind the sediment at the bottom. This process, called racking, helps clarify your wine.
Attach the airlock again and move the vessel to a cool, dark location for 2-3 months. During this time, you’ll want to rack the wine 1-2 more times whenever significant sediment builds up.
Step 7: Bottling
Once your wine has cleared and fermentation has completely stopped (no bubbles in the airlock for at least two weeks), it’s time to bottle. Before bottling, you may want to stabilize your wine with another crushed Campden tablet and, if desired, sweeten to taste.
Siphon into sanitized wine bottles and cork immediately. Label with the date and type of wine – trust me, once you start making different batches, you’ll appreciate knowing which is which!
Step 8: Aging
Store your bottles in a cool, dark place. While you could technically drink your elderberry wine after a month or two, patience truly rewards here. I find that 6-12 months of aging creates a dramatically better flavor profile.
5 Unique Elderberry Wine Variations
Now that you know the basic elderberry wine recipe, let’s explore five unique variations that will expand your home winemaking repertoire!
1. Elderberry-Blackberry Blend
Additional Ingredients:
- 1 pound fresh blackberries
- 1/4 cup honey (optional, for backsweetening)
Modifications:
Reduce elderberries to 2 pounds and add the blackberries to your fruit bag during the initial steeping. This creates a deeper, more complex berry flavor with notable tannins. The honey can be added after fermentation if you prefer a sweeter wine.
2. Spiced Elderberry Wine
Additional Ingredients:
- 2 cinnamon sticks
- 5 whole cloves
- 1 star anise
- 1 vanilla bean, split
- Zest of 1 orange
Modifications:
Add all spices to the steeping mixture, but remove them before primary fermentation begins. This creates a wonderful mulled wine character that’s perfect for winter gatherings. I discovered this variation three winters ago when looking for something special to serve at our annual neighborhood holiday potluck.
3. Elderberry-Apple Wine
Additional Ingredients:
- 2 pounds sweet apples, cored and chopped
- 1/2 teaspoon malic acid (in addition to the regular acid blend)
Modifications:
Reduce elderberries to 2 pounds and add chopped apples to your steeping process. The malic acid enhances the apple character while maintaining good structure. This version has a lighter color and more subtle elderberry notes.
4. Elderberry Port-Style
Additional Ingredients:
- Additional 1 pound of elderberries (total 4 pounds)
- 3.5 pounds sugar (instead of 2.5)
- 1 cup brandy (added after fermentation)
Modifications:
Follow the basic recipe but with the increased fruit and sugar. After fermentation is complete and before bottling, add the brandy. This creates a higher alcohol content and sweeter profile similar to port wine. Age this one for at least a year for best results.
5. Elderberry-Ginger Wine
Additional Ingredients:
- 2-inch piece of fresh ginger, sliced
- Juice and zest of 1 lemon
- 2 tablespoons dried elderflowers (if available)
Modifications:
Add the ginger and lemon during the steeping phase, then remove before primary fermentation. If you have access to dried elderflowers, add them as well for a fascinating floral dimension that complements the spicy ginger beautifully.
Cooking Tips for Successful Elderberry Wine
As with any recipe, there are little tricks I’ve learned along the way that can make all the difference:
- Temperature matters: Fermentation is most successful between 65-75°F (18-24°C). Too cold and fermentation stalls; too warm and you might get off-flavors.
- Sanitation is crucial: The success of your wine depends on allowing only the right yeasts to thrive. Sanitize all equipment thoroughly before use.
- Patience pays off: Resist the temptation to taste too early or skip aging steps. Wine improves dramatically with time.
- Keep notes: Write down what you did for each batch, including any variations or mistakes. This helps you replicate successes and avoid repeated errors.
- Use dark bottles: Elderberry wine keeps best in dark-colored bottles that prevent light damage.
My Elderberry Wine Story
The first time I made elderberry wine was after Eric and I moved to our farmhouse. We discovered a massive elderberry bush at the edge of our property that the previous owners had planted. That August, with Lila still a baby napping in her carrier, I tentatively harvested my first batch of berries.
My first attempt was… educational, let’s say. I didn’t remove all the stems properly, skimped on sanitizing, and was far too impatient with the aging. The resulting wine was simultaneously too sweet and oddly bitter, with a faint aroma that reminded me of old gym socks!
But I learned, batch by batch. Now, our homemade elderberry wine has become something of a local legend among our friends. We open a bottle to celebrate the changing seasons, to toast good news, or sometimes just to remind ourselves of summer’s abundance in the middle of winter.
Nutritional Information and Health Benefits
While elderberry wine is primarily enjoyed for its flavor, elderberries themselves have a long history of traditional health uses. They’re:
- High in vitamin C and antioxidants
- Rich in flavonoids and anthocyanins
- Traditionally used to support immune function
A 5-ounce glass of homemade elderberry wine typically contains:
- Calories: Approximately 120-150, depending on residual sugar
- Alcohol: About 11-13% by volume
- Sugar: Varies widely based on sweetening preference
- Carbohydrates: 5-12g per glass
Remember that alcohol should always be consumed in moderation, and homemade wine can vary significantly in alcohol content.
Healthier Alternatives
If you’re looking for a lower-alcohol or alcohol-free alternative, consider these modifications:
- Low-alcohol version: Use less sugar initially and choose a yeast with lower alcohol tolerance.
- Elderberry cordial: Skip the fermentation entirely and make a concentrated syrup with elderberries, sugar, and a bit of lemon. Dilute with sparkling water for a refreshing non-alcoholic beverage.
- Elderberry mead: For a different fermentation profile, replace some or all of the sugar with honey. This creates a mellower, more complex sweetness.
Serving Suggestions
Elderberry wine pairs beautifully with:
- Rich, savory dishes like venison cube steak or beef stew
- Sharp cheeses, particularly aged cheddars and blue cheeses
- Dark chocolate desserts
- Game meats and mushroom-based dishes
- Holiday meals featuring turkey or ham
I love serving our spiced elderberry wine variation slightly warm during the winter months – it’s like mulled wine without the extra preparation!
Common Mistakes to Avoid
Even after years of making this elderberry wine recipe, I occasionally make mistakes. Here are some common pitfalls to watch for:
- Ignoring sanitization: This is the number one reason for failed batches. Sanitize everything that touches your wine.
- Using unripe berries: Green elderberries can cause stomach upset and create bitter flavors. Use only fully ripe, dark purple berries.
- Rushing the process: Fermentation and aging take time. Cutting these periods short results in inferior wine.
- Improper storage: Store bottles horizontally to keep the corks moist and prevent air from entering.
- Neglecting regular checking: During active fermentation, check your airlocks regularly to ensure they haven’t dried out or become blocked.
Storing & Reheating Tips
Properly stored, elderberry wine will continue to improve for 2-3 years. Some tips for optimal storage:
- Store bottles horizontally in a cool (55-65°F), dark place
- Maintain consistent temperature – fluctuations can damage wine
- Keep humidity at moderate levels to prevent mold on corks
- Label bottles with the date, variation type, and any special notes
For the port-style variation, aging can continue even longer – up to 5-7 years for exceptional complexity.
Frequently Asked Questions
Is it safe to make wine at home?
Yes, home winemaking is very safe when proper sanitization is followed. The alcohol and acidity of wine naturally prevent harmful bacteria from developing.
Can I use frozen elderberries?
Absolutely! Freezing actually helps break down cell walls, releasing more juice and flavor. Just thaw before using in your elderberry wine recipe.
How do I know when fermentation is complete?
Primary fermentation is complete when bubbling in the airlock slows to less than one bubble per minute. Secondary fermentation is complete when the wine clears and no bubbling is observed for at least two weeks.
If you’re interested in more preserving recipes, check out my cherries in the snow recipe for another delicious way to enjoy seasonal fruits!
Final Thoughts
There’s something profoundly satisfying about crafting elderberry wine at home. The process connects us to ancient traditions while creating something uniquely our own. As you work through this elderberry wine recipe, remember that each batch tells its own story – of the season, of your care, and of the time it represents.
Whether you’re making your first batch or your fiftieth, I hope you’ll approach the process with curiosity and patience. The rewards – that first sip of wine you’ve nurtured from berry to bottle – make every step worthwhile.
I’d love to hear how your elderberry wine adventures unfold! Share your experiences, questions, or favorite variations in the comments below. And if you’re looking for more seasonal recipes that celebrate nature’s bounty, be sure to subscribe to my newsletter for fresh inspiration delivered straight to your inbox.
Happy winemaking, friends!
Elderberry wine recipe: How to make 5 unique batches at home
Total Time: 1 hour
Yield: 1 gallon 1x
Diet: Gluten Free
Description
Ingredients
Scale
For your basic elderberry wine recipe, you’ll need:
- 3 pounds fresh elderberries (or 1.5 pounds dried)
- 2.5 pounds granulated sugar
- 1 gallon filtered water
- 2 teaspoons acid blend (available at brewing supply stores)
- 1 teaspoon yeast nutrient
- 1 Campden tablet, crushed
- 1 packet wine yeast (I recommend Red Star Premier Rouge or Lalvin EC-1118)
- 1 teaspoon pectic enzyme
Equipment needed:
- 1-gallon glass fermenting vessel (carboy)
- Airlock and bung
- Large pot for boiling
- Straining bag
- Sanitizing solution
- Funnel
- Rubber tubing for siphoning
- Wine bottles and corks (for bottling)
Instructions
First, if using fresh elderberries, remove all stems carefully. The stems contain compounds that can make your wine bitter or even cause stomach upset. This is a great activity to do outside on the porch with a cup of tea and a good podcast. My daughter Lila loves to help with this step, and we’ve had some of our best conversations while de-stemming berries together.
Once cleaned, gently rinse your berries in cold water. If using dried berries, you can skip directly to the next step.
In a large pot, bring half your water (about 2 quarts) to a boil. While it’s heating, place your elderberries in a mesh brewing bag and gently crush them to release their juices. When the water reaches a gentle boil, turn off the heat and submerge your bag of berries in the water. Add your sugar and stir until completely dissolved. Cover the pot and let it steep for about 30 minutes. After steeping, remove the bag of berries (squeeze gently to extract remaining juice) and add the remaining cold water to bring the temperature down to about 70°F (21°C). Add the acid blend, yeast nutrient, and crushed Campden tablet. Stir well, then transfer to your sanitized fermenting vessel. Cover with a cloth and let sit for 24 hours. This waiting period allows the Campden tablet to dissipate, which otherwise might kill your yeast. After 24 hours, add the pectic enzyme and stir. Wait another 12 hours, then add your wine yeast according to the package instructions. Typically, this involves rehydrating the yeast in a small amount of warm water before adding it to your must. Secure your airlock and bung to the fermenting vessel. Within 24-48 hours, you should see bubbling activity in the airlock, indicating fermentation has begun! Keep your fermenting vessel in a location with a consistent temperature between 65-75°F (18-24°C). I keep mine in our pantry, where Eric knows not to disturb my “wine experiment corner.” After 7-10 days, when the most vigorous bubbling has subsided, it’s time to transfer your wine to secondary fermentation. Using sanitized equipment, siphon (rack) your wine into another sanitized vessel, leaving behind the sediment at the bottom. This process, called racking, helps clarify your wine. Attach the airlock again and move the vessel to a cool, dark location for 2-3 months. During this time, you’ll want to rack the wine 1-2 more times whenever significant sediment builds up. Once your wine has cleared and fermentation has completely stopped (no bubbles in the airlock for at least two weeks), it’s time to bottle. Before bottling, you may want to stabilize your wine with another crushed Campden tablet and, if desired, sweeten to taste. Siphon into sanitized wine bottles and cork immediately. Label with the date and type of wine – trust me, once you start making different batches, you’ll appreciate knowing which is which! Store your bottles in a cool, dark place. While you could technically drink your elderberry wine after a month or two, patience truly rewards here. I find that 6-12 months of aging creates a dramatically better flavor profile.
- Prep Time: 60 minutes
- Cook Time: 0 minutes
- Category: Beverages
- Method: Fermentation
- Cuisine: Home Brewing
Nutrition
- Serving Size: 5 oz
- Calories: 150
Keywords: elderberry wine recipe, homemade elderberry wine, elderberry fermentation, fruit wine making, elderberry port recipe