Table of Contents
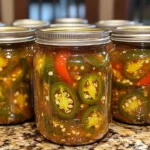
There’s something magical about preserving the summer heat in a jar. The first time I made cowboy candy—those sweet and spicy candied jalapeños—my kitchen filled with an intoxicating aroma that had my husband Eric sneaking slices straight from the pot! My cowboy candy recipe canning adventure started three summers ago when our garden blessed us with more jalapeños than we could possibly use fresh. Now, it’s become a late-summer tradition that fills our pantry with jars of this versatile, zingy treat that brightens up everything from cream cheese bagels to grilled chicken.
If you’ve never tried canning cowboy candy, you’re in for a delicious adventure! These candied jalapeños deliver the perfect balance of sweetness and heat, and they make wonderful homemade gifts too. The best part? The beautiful jars line your pantry shelves for months, ready to add a punch of flavor whenever you need it.
Why You’ll Love This Cowboy Candy Recipe Canning
This cowboy candy recipe canning project is going to become your new favorite for so many reasons:
- Perfect Gift Potential: Nothing says “I care” like homemade cowboy candy in a pretty jar with a ribbon!
- Adjustable Heat: You control the spice level by removing seeds (or not)
- Pantry Staple: These gorgeous jars last up to a year
- Versatile Flavor Bomb: Use on cream cheese, sandwiches, tacos, grilled meats, or anything that needs a sweet-spicy kick
- Budget-Friendly: When jalapeños are in season, this recipe costs pennies per jar
- Beginner-Friendly: Even if you’re new to canning, this recipe is straightforward and reliable
- Customizable: Once you master the basic cowboy candy recipe canning technique, you can experiment with adding garlic, ginger, or different peppers
Ingredients
For this cowboy candy recipe, gather the following:
- 3 pounds fresh, firm jalapeño peppers
- 2 cups apple cider vinegar
- 6 cups granulated sugar
- 1/2 teaspoon turmeric
- 1/2 teaspoon celery seeds
- 3 teaspoons granulated garlic
- 1 teaspoon ground cayenne pepper (optional for extra heat)
- Canning jars with new lids and bands (approximately 5-6 pint jars)
Substitution Tips:
- If jalapeños aren’t available, serrano peppers make an excellent (spicier) substitute
- White vinegar can replace apple cider vinegar in a pinch, though you’ll lose some flavor depth
- Don’t have celery seed? Try mustard seed or leave it out entirely
- If you prefer less sugar, you can reduce by up to 1 cup, but the syrup won’t be as thick
Timing
- Prep Time: 45 minutes (includes slicing peppers and sterilizing jars)
- Cook Time: 15 minutes
- Processing Time: 10 minutes
- Total Time: 1 hour 10 minutes
- Inactive Time: 24 hours for flavors to develop
Step-by-Step Instructions
Step 1: Prepare Your Workspace and Ingredients
Wear gloves—seriously! I learned this lesson the hard way when I once rubbed my eye after slicing three pounds of jalapeños. Not my finest moment! Set up your canning station with clean jars, a large pot for processing, and all ingredients measured and ready to go.
Wash jalapeños thoroughly and remove stems. For milder cowboy candy, remove seeds and membranes (I usually remove about half the seeds for a medium heat). Slice jalapeños into 1/4-inch rings.
Step 2: Make the Syrup
In a large, non-reactive pot (I love my enameled Dutch oven for this), combine the apple cider vinegar, sugar, turmeric, celery seeds, garlic, and cayenne if using. Bring to a boil, stirring until sugar dissolves completely.
Reduce heat and simmer for 5 minutes, allowing the syrup to thicken slightly and the spices to infuse their flavors.
Step 3: Cook the Jalapeños
Add the sliced jalapeños to the syrup and return to a boil. Reduce heat and simmer for exactly 4 minutes. This is the perfect timing for cowboy candy recipe canning—the peppers will soften slightly while retaining their vibrant color and some texture.
Step 4: Fill the Jars
Using a slotted spoon, pack the jalapeño slices into sterilized jars, leaving 1/4-inch headspace. When all jalapeños are in jars, ladle the hot syrup over them, maintaining the 1/4-inch headspace. Remove air bubbles by running a plastic knife or specialized canning tool around the inside of each jar.
Wipe rims clean with a dampened paper towel, add lids, and secure with bands finger-tight.
Step 5: Process the Jars
Process jars in a water bath canner for 10 minutes (adjust for altitude if necessary). Remember to start timing once the water returns to a full boil.
When processing time is complete, remove jars and allow them to cool undisturbed for 24 hours. You’ll hear that satisfying “ping” as each jar seals!
Cooking Tips for Cowboy Candy Success
-
Ventilation matters: This canning cowboy candy recipe produces strong vinegar fumes. Open windows or use exhaust fans to keep your breathing comfortable.
-
Test your heat level: If you’re unsure about spice tolerance, try a small batch removing all seeds first. You can always add heat to the next batch!
-
Sterilize properly: For successful canning cowboy candy recipe results, ensure jars are completely sterilized to prevent spoilage.
-
Syrup tricks: If you have leftover syrup, don’t toss it! This liquid gold makes an amazing glaze for meats or a unique cocktail mixer.
-
Cooling patience: Allow your cowboy candy to mature in the jars for at least 2 weeks before opening—the flavors mellow and marry beautifully during this time.
-
Consistent slicing: Try to cut jalapeño slices uniformly thick for even cooking and prettier jars.
-
Safety first: Always follow up-to-date canning safety guidelines to ensure your cowboy candy is shelf-stable and safe.
My Cowboy Candy Story
Last summer, I brought a jar of my cowboy candy to a neighborhood cookout, along with a block of cream cheese and crackers. I hadn’t even finished setting up when Lila proudly announced to everyone, “My mommy makes the best spicy candy!” Before I knew it, neighbors were gathered around the appetizer table, slathering cream cheese and cowboy candy onto crackers.
By the end of the night, I had promises to deliver eight jars to various homes on our street, and my 7-layer taco salad recipe (which usually steals the show) was completely overshadowed! There’s something about that sweet-heat combination that turns people into instant fans.
Nutritional Information
Per 2 tablespoon serving:
- Calories: 35
- Carbohydrates: 8g
- Protein: 0g
- Fat: 0g
- Sodium: 1mg
- Sugar: 7g
Jalapeños are surprisingly nutritious, containing:
- Vitamin C (supports immune health)
- Vitamin B6 (helps with brain development and function)
- Vitamin A (promotes vision and skin health)
- Capsaicin (offers anti-inflammatory benefits)
According to research from the American Journal of Clinical Nutrition, consuming spicy foods like jalapeños may temporarily boost metabolism and help with appetite control.
Healthier Alternatives
Want to adjust this cowboy candy recipe for canning to fit dietary preferences? Here are some options:
- Lower-sugar version: Reduce sugar to 4 cups and add 1/4 cup honey for depth of flavor
- Sugar-free option: Use a sugar substitute designed for canning (follow manufacturer’s conversion)
- AIP-friendly: Omit cayenne pepper and black pepper for an autoimmune protocol compliant version
- Milder variation: Use mini sweet peppers combined with just a few jalapeños for color and minimal heat
Serving Suggestions
The versatility of cowboy candy is almost endless! Here are my family’s favorite ways to enjoy it:
- Classic cream cheese and crackers appetizer (my go-to for unexpected guests)
- Chopped and mixed into cornbread batter
- Tucked into grilled cheese sandwiches
- Added to tacos, burritos, or quesadillas
- Chopped and stirred into scrambled eggs
- Serve it as a flavorful relish for hot dogs or juicy burgers.
- Mixed into deviled egg filling
- Served alongside bacon-wrapped little smokies for an irresistible appetizer
- Puréed with a bit of the syrup for a glaze on grilled chicken or pork
For entertaining, try setting out a “cowboy candy bar” with crackers, different cheeses, and your homemade candied jalapeños. Guests can create their own perfect bite!
Common Mistakes to Avoid
Even with a straightforward cowboy candy recipe canning process, there are a few pitfalls to watch for:
-
Overcooking the jalapeños: Four minutes is perfect—any longer and they’ll become too soft.
-
Not wearing gloves: Trust me on this one! Jalapeño oils can stay on your skin for hours, causing irritation.
-
Forgetting to remove air bubbles: This crucial step prevents seal failures.
-
Rushing the cooling process: Moving jars too soon can disrupt the sealing process.
-
Using old canning lids: Always use new lids for proper sealing.
-
Skipping the processing step: Water bath processing is essential for food safety in this cowboy candy recipe canning project.
Storing & Reheating Tips
Properly sealed jars of cowboy candy can be stored in a cool, dark pantry for up to one year. After opening, keep refrigerated and use within 3 months for the best flavor.
The beautiful thing about cowboy candy is that it doesn’t need reheating—it’s ready to use straight from the jar! However, if you prefer your candied jalapeños warm (they’re amazing on nachos this way), simply heat the desired amount in a small saucepan or microwave briefly.
For gift-giving, I like to let my cowboy candy age for at least two weeks before sharing. The flavors deepen substantially during this time, and the heat level mellows just enough to be perfect.
FAQs
How spicy is this canning cowboy candy recipe?
The spice level depends largely on how many seeds and membranes you remove. With all seeds left in, it’s quite spicy. Remove all seeds and membranes for a milder version that still delivers jalapeño flavor without overwhelming heat.
Can I double this cowboy candy recipe for canning?
I don’t recommend doubling the batch. Working with more than 3 pounds of jalapeños at once can lead to inconsistent cooking. Instead, make multiple separate batches for the best quality.
Why did my cowboy candy turn out too soft?
Likely the jalapeños were cooked longer than the recommended 4 minutes. For perfect texture, time the cooking precisely and don’t let the peppers simmer beyond the recipe instructions.
Do I really need to process the jars if I’m planning to refrigerate them?
If you plan to use your cowboy candy within 2-3 weeks and will keep it refrigerated, you can skip the water bath processing. However, to make them shelf-stable and gift-worthy, proper canning is necessary.
Final Thoughts
There’s something deeply satisfying about transforming humble jalapeños into jars of glistening, sweet-hot cowboy candy. This cowboy candy recipe canning project connects us to generations of food preservers while creating something that brings joy to modern tables.
Whether you’re an experienced canner or trying your hand at preservation for the first time, I hope this cowboy candy recipe brings you as much joy as it has brought to my family. From our kitchen to yours, happy canning!
Try it this weekend and let me know in the comments how your cowboy candy turned out!
Cowboy Candy Recipe Canning: 7 Sweet Tips for Success
Total Time: 70 minutes
Yield: 6 pint jars 1x
Diet: Gluten Free
Description
Are you ready to elevate your canning game? Explore our cowboy candy recipe canning tips for sweet success. Discover the secrets today!
Ingredients
Scale
For this cowboy candy recipe, gather the following:
- 3 pounds fresh, firm jalapeño peppers
- 2 cups apple cider vinegar
- 6 cups granulated sugar
- 1/2 teaspoon turmeric
- 1/2 teaspoon celery seeds
- 3 teaspoons granulated garlic
- 1 teaspoon ground cayenne pepper (optional for extra heat)
- Canning jars with new lids and bands (approximately 5-6 pint jars)
Instructions
Wear gloves—seriously! I learned this lesson the hard way when I once rubbed my eye after slicing three pounds of jalapeños. Not my finest moment! Set up your canning station with clean jars, a large pot for processing, and all ingredients measured and ready to go.
Wash jalapeños thoroughly and remove stems. For milder cowboy candy, remove seeds and membranes (I usually remove about half the seeds for a medium heat). Slice jalapeños into 1/4-inch rings.
In a large, non-reactive pot (I love my enameled Dutch oven for this), combine the apple cider vinegar, sugar, turmeric, celery seeds, garlic, and cayenne if using. Bring to a boil, stirring until sugar dissolves completely. Reduce heat and simmer for 5 minutes, allowing the syrup to thicken slightly and the spices to infuse their flavors. Add the sliced jalapeños to the syrup and return to a boil. Reduce heat and simmer for exactly 4 minutes. This is the perfect timing for cowboy candy recipe canning—the peppers will soften slightly while retaining their vibrant color and some texture. Using a slotted spoon, pack the jalapeño slices into sterilized jars, leaving 1/4-inch headspace. When all jalapeños are in jars, ladle the hot syrup over them, maintaining the 1/4-inch headspace. Remove air bubbles by running a plastic knife or specialized canning tool around the inside of each jar. Wipe rims clean with a dampened paper towel, add lids, and secure with bands finger-tight. Process jars in a water bath canner for 10 minutes (adjust for altitude if necessary). Remember to start timing once the water returns to a full boil. When processing time is complete, remove jars and allow them to cool undisturbed for 24 hours. You’ll hear that satisfying “ping” as each jar seals!
- Prep Time: 45 minutes
- Cook Time: 25 minutes
- Category: Canning
- Method: Canning
- Cuisine: American
Nutrition
- Serving Size: 2 tablespoons
- Calories: 35
Keywords: cowboy candy recipe canning, candied jalapeños, sweet and spicy jalapeños, homemade cowboy candy, jalapeño canning recipe, preserving jalapeños, water bath canning, sweet pickled jalapeños, spicy condiment recipe