Description
Ingredients
For the perfect cherries in the snow recipe, you’ll need:
Crust Layer:
-
- 1 cup all-purpose flour
-
- ½ cup unsalted butter, softened
-
- ¼ cup powdered sugar
-
- ½ cup finely chopped pecans (optional, but adds wonderful texture)
Cream Cheese Layer:
-
- 1 package (8 oz) cream cheese, softened
-
- 1 cup powdered sugar
-
- 1 teaspoon vanilla extract
-
- 1 cup heavy whipping cream, whipped (or 2 cups Cool Whip for a quicker option)
Cherry Layer:
-
- 2 cans (21 oz each) cherry pie filling
-
- 1 teaspoon almond extract (optional, but elevates the cherry flavor beautifully)
Topping:
-
- 2 cups whipped topping (like Cool Whip)
-
- ¼ cup shaved white chocolate or coconut flakes for the “snow” effect
-
- A few fresh cherries with stems for garnish (if in season)
Ingredient Notes:
If cream cheese isn’t your thing, mascarpone makes a delicious substitute with a slightly milder flavor. For a lighter version, try Neufchâtel cheese, which has 1/3 less fat but still delivers that creamy richness we all crave.
Can’t find good cherry pie filling? Make your own with frozen dark cherries, s
Instructions
Preheat your oven to 350°F. Mix flour, softened butter, powdered sugar, and chopped pecans (if using) in a medium bowl. The dough will be crumbly, but it should stick together when gently pressed.
Press this mixture firmly into the bottom of a 9×13 inch baking dish, creating an even layer. I like to use the bottom of a measuring cup to get a nice, flat surface.
Bake for 15-18 minutes until just lightly golden around the edges. Don’t overbake—we’re going for tender, not crunchy! Let it cool fully before proceeding to the next step—this ensures the layers stay intact.
Olivia’s Tip: If you’re really short on time, substitute a pre-made graham cracker crust, or use 2 cups of crushed shortbread cookies mixed with 6 tablespoons of melted butter. Different flavor profile, but equally delicious!
Beat the softened cream cheese in a large bowl until it becomes light and airy. Add powdered sugar and vanilla, then continue beating until smooth and well combined.
If using heavy cream, whip it separately until stiff peaks form, then gently fold into the cream cheese mixture. If using Cool Whip, fold it in until just combined. The key is keeping it light and airy!
Spread this mixture evenly over the cooled crust. Use an offset spatula for the smoothest finish.
Olivia’s Tip: Make sure your cream cheese is truly room temperature before beating. Cold cream cheese will give you lumps that no amount of mixing can fix—I learned this the hard way at my first holiday party as a newlywed!
If using the almond extract, stir it into your cherry pie filling to enhance the flavor.
Carefully spread the cherry pie filling over the cream cheese layer, making sure to distribute the cherries evenly. I like to spoon it on in dollops, then gently spread to avoid disturbing the cream layer underneath.
Olivia’s Tip: For a more striking visual effect, reserve ¼ cup of the cream cheese mixture and drop small dollops into the cherry layer. Then use a toothpick to create beautiful swirls!
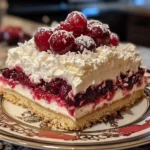
Spread the whipped topping over the cherry layer, creating gentle peaks and valleys with your spatula for a snow-like effect.
Sprinkle with white chocolate shavings or coconut flakes to create the “snow” that gives this dessert its charming name.
Cover loosely with plastic wrap and refrigerate for at least 4 hours, but preferably overnight. This chilling time is non-negotiable—it allows the flavors to meld and the layers to set properly.
Olivia’s Tip: Place toothpicks in the dessert before covering with plastic wrap to prevent the wrap from sticking to your beautiful snow topping!
Just before serving, add a few fresh cherries with stems for a beautiful presentation, if available.
For special occasions, I’ve been known to add a light dusting of edible pearl dust or shimmer for a magical winter wonderland effect!
Cut into squares (approximately 12-15 servings) and serve chilled. Watch as your family or guests’ eyes light up when they see those beautiful layers!
- Prep Time: 30 minutes
- Cook Time: 15 minutes
- Category: Dessert
- Method: Baked
- Cuisine: American
Nutrition
- Serving Size: 1 slice
- Calories: 380 per serving
Keywords: cherries in the snow, layered cherry dessert, cream cheese cherry bars, cherry holiday dessert, no bake cherry dessert, whipped cream dessert