Table of Contents
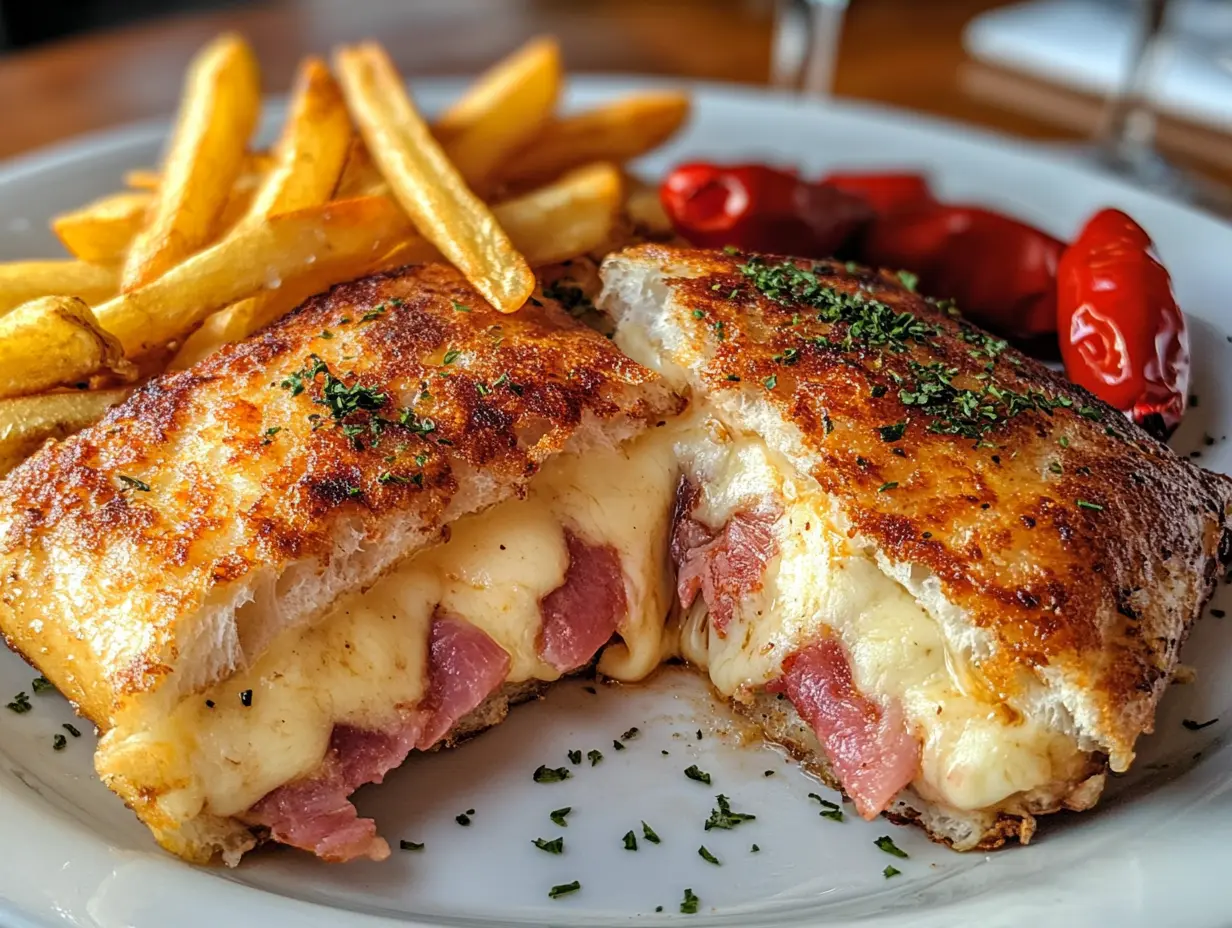
There’s something magical about discovering a recipe that transforms your dinner table into a destination. That’s exactly what happened when I first tried making cachopo, a traditional Spanish dish that originates from the Asturias region. This cachopo recipe quickly became a family favorite in our little yellow farmhouse, combining crispy breaded exterior with ooey-gooey cheese and savory ham. If you’ve been searching for a show-stopping dinner that brings everyone to the table with wide eyes and eager appetites, this is it! Much like my bacon wrapped little smokies recipe that disappears at every gathering, this cachopo never lasts long at our dinner table.
The first time I made cachopo, my husband Eric declared it “restaurant quality,” my daughter Lila clapped her hands in delight, and even my picky 3-year-old Caleb cleaned his plate. That’s when I knew this recipe deserved a permanent spot in our family dinner rotation.
Why You’ll Love This Cachopo Recipe
If you’re anything like me, juggling work deadlines, school pickups, and trying to put a decent meal on the table by 6 PM, you need recipes that deliver big flavor without requiring culinary school credentials. This cachopo recipe does exactly that!
Here’s why you’ll fall in love with it:
- Impressive without stress: While cachopo looks like something from a high-end restaurant, it’s surprisingly straightforward to prepare.
- Customizable fillings: The traditional recipe uses ham and cheese, but you can adapt based on what your family loves or what’s in your fridge.
- Make-ahead friendly: You can prepare these up to the breading stage earlier in the day, making dinner time a breeze.
- Crowd-pleaser: The combination of crispy exterior and melty interior makes this irresistible to adults and kids alike.
- Special occasion worthy: Need a dinner that feels celebratory without hours in the kitchen? Cachopo is your answer.
Ingredients
For this traditional cachopo recipe, you’ll need:
For the Cachopo:
- 4 large veal or beef fillets (about ¼ inch thick, pounded even thinner)
- 8 slices of good quality ham (Serrano or Ibérico for authenticity, but prosciutto works well too)
- 8 slices of semi-cured cheese (traditional Asturian cheese or substitute with provolone or Gouda)
- 2 cups all-purpose flour
- 4 large eggs, beaten
- 3 cups breadcrumbs (preferably panko for extra crispiness)
- 1 teaspoon salt
- ½ teaspoon black pepper
- 1 teaspoon paprika (Spanish if possible)
- Olive oil for frying
For Serving:
- Lemon wedges
- French fries
- Roasted red peppers
Ingredient Substitutions:
- No veal? Use thin beef cutlets, pork loin, or even chicken breasts pounded thin.
- Vegetarian version? Try using large portobello mushrooms or eggplant slices.
- Gluten-free needs? Substitute regular flour with gluten-free flour, and use gluten-free breadcrumbs.
- Cheese options? While traditional Asturian cheese is authentic, any good melting cheese works—Gouda, provolone, or even mozzarella.
Timing
- Prep Time: 30 minutes
- Cook Time: 15 minutes
- Total Time: 45 minutes
Step-by-Step Instructions
Step 1: Prepare the Meat
Place your veal or beef fillets between plastic wrap and gently pound them until they’re about ⅛ inch thick. This is where patience pays off—thinner meat cooks more quickly and evenly. Season both sides with a little salt and pepper.
I like to use the flat side of a meat mallet for this, but the bottom of a heavy pan works in a pinch! This is similar to how I prepare the meat for my venison cube steak recipes, ensuring tenderness with each bite.
Step 2: Assemble the Filling
This is where the magic happens! Lay your thinned meat flat and layer 2 slices of ham and 2 slices of cheese on one half of each piece. Be sure to leave about a half-inch border around the edges.
Fold the other half of the meat over the filling, creating a pocket. Press the edges firmly to seal—think of it as making a giant savory empanada. If needed, use toothpicks to keep everything secure during cooking.
Step 3: Prepare the Breading Station
Set up your breading assembly line:
- First dish: Flour seasoned with salt, pepper, and paprika
- Second dish: Beaten eggs
- Third dish: Breadcrumbs
This organized approach makes the process much cleaner and more efficient.
Step 4: Bread the Cachopo
With gentle hands, coat each stuffed cachopo first in flour, shaking off any excess. Next, dip into the beaten egg, ensuring it’s fully coated. Finally, press into the breadcrumbs, covering every surface. For an extra-crispy finish, you can repeat the egg and breadcrumb steps.
Pro tip: Use one hand for dry ingredients and one hand for wet to avoid the dreaded “breaded fingers” that make this process messier than it needs to be!
Step 5: Fry to Golden Perfection
Heat about ½ inch of olive oil in a large, heavy skillet over medium-high heat. The oil is ready when a few breadcrumbs sizzle immediately when dropped in.
Carefully place your cachopo in the hot oil and cook until golden brown, about 3-4 minutes per side. Don’t rush this step—proper browning equals proper flavor!
Transfer to a paper towel-lined plate to absorb excess oil.
Step 6: Finish in the Oven (Optional)
For extra insurance that your cheese is perfectly melty and your meat is cooked through, place the fried cachopos on a baking sheet and finish in a 350°F oven for 5-7 minutes.
Step 7: Serve and Enjoy
Remove any toothpicks and serve immediately, garnished with lemon wedges, alongside crispy french fries and roasted red peppers for an authentic Spanish experience.
Cooking Tips
- Temperature matters: Make sure your oil is hot enough (around 350°F) before adding the cachopo. Too cool and it will absorb oil, too hot and it will burn before cooking through.
- Work in batches: Don’t crowd the pan, as this lowers the oil temperature and results in soggy exteriors.
- Meat thickness: The thinner you pound the meat, the easier it will be to seal and cook evenly.
- Rest before cutting: Let the cachopo rest for 2-3 minutes after cooking. This helps the cheese set slightly so it doesn’t all run out when you cut into it.
- Oil choice: While olive oil is traditional, you can use vegetable or canola oil for a higher smoke point if preferred.
Personal Story
The first time I encountered cachopo wasn’t in a fancy restaurant but during a rainy afternoon browsing through international cookbooks at our local library. Lila was at a playdate, Caleb was napping, and I had a rare moment of quiet to myself. The photo in the cookbook looked so indulgent that I immediately photographed the recipe with my phone.
That weekend, I surprised Eric with what I called my “Spanish experiment.” With jazz playing softly and a glass of Rioja in hand, I nervously presented my first cachopo. The moment he cut into it, revealing that perfect cheese pull and took his first bite, his expression told me everything. “Liv, this is incredible,” he said, wide-eyed.
Now cachopo has become our special “date night at home” meal. Even though it’s substantial enough to feed an army, we make it just for the two of us when the kids are at Grandma’s, pairing it with good wine and catching up on all the conversations that get lost in the day-to-day rush of parenting.
Nutritional Information
Let’s be honest – cachopo is a splurge meal, not an everyday health food. A typical serving contains approximately:
- Calories: 650-800 per serving
- Protein: 45g
- Carbohydrates: 40g
- Fat: 35g
While it’s definitely indulgent, cachopo provides excellent protein from the meat, and when served with a side salad, you can add valuable nutrients to balance the meal.
Healthier Alternatives
While traditional cachopo is an occasional treat, here are some modifications to lighten it up:
- Air fryer method: Spray your breaded cachopo with olive oil and air fry at 380°F for about 12-15 minutes, flipping halfway through.
- Baked version: Place on a parchment-lined baking sheet, spray with olive oil, and bake at 425°F for 20-25 minutes, flipping halfway.
- Lighter filling: Use turkey ham and reduced-fat cheese to cut calories.
- Breading alternatives: Try crushed cornflakes or almond flour for different flavor profiles and nutritional benefits.
- Serve with roasted vegetables instead of french fries for a lighter side.
These modifications maintain the essence of cachopo while reducing the calorie count significantly.
Serving Suggestions
The traditional Asturian way to serve cachopo is alongside:
- Crispy french fries: The perfect vehicle for soaking up any cheese that escapes.
- Roasted red peppers: Their sweet, smoky flavor complements the richness of the cachopo.
- Fresh lemon wedges: A squeeze brightens the entire dish.
- Simple green salad: Dressed lightly with olive oil and vinegar to cut through the richness.
For drinks, a Spanish red wine like Tempranillo pairs beautifully, or try a crisp cider, which is traditional in Asturias.
For a complete Spanish-themed dinner, start with my crab omelette recipe as an appetizer, and finish with a light citrus dessert.
Common Mistakes to Avoid
- Overstuffing: It’s tempting to pile on the cheese and ham, but this makes sealing difficult and leads to filling leakage.
- Not sealing edges properly: Take time to firmly press the edges together to create a proper seal.
- Oil too hot or too cold: Either extreme leads to problems—too hot burns the outside before the inside cooks, too cold makes it greasy.
- Skipping the resting time: Cut immediately, and all that beautiful cheese flows out instead of staying mostly inside.
- Inconsistent meat thickness: Uneven pounding leads to uneven cooking.
Storing & Reheating Tips
While cachopo is best enjoyed fresh, leftovers can still be delicious if handled properly:
- Refrigeration: Store cooled leftover cachopo in an airtight container for up to 2 days.
- Freezing: For longer storage, freeze fully cooled cachopo wrapped individually in plastic wrap, then placed in freezer bags. Keeps for up to 1 month.
- Reheating: For best results, reheat in a 350°F oven for 10-15 minutes until heated through and crispy again. Avoid microwave reheating as it makes the breading soggy.
FAQs
Q: Can I prepare cachopo ahead of time?
A: Yes! You can stuff and bread the cachopos up to 4 hours ahead, keeping them refrigerated until ready to cook. This makes them perfect for dinner parties.
Q: What’s the origin of cachopo?
A: Cachopo originated in Asturias, northern Spain, and was traditionally made with veal. The name “cachopo” actually refers to a fallen hollow tree trunk, which is said to resemble the shape of the dish.
Q: Can I make mini cachopos as appetizers?
A: Absolutely! Use smaller pieces of meat and less filling to create bite-sized versions. Reduce cooking time accordingly and serve with toothpicks for a crowd-pleasing tapas.
Final Thoughts
The beauty of this cachopo recipe lies in its ability to transform an ordinary evening into something special. It reminds me that sometimes the most meaningful family moments happen not around restaurant tables, but in our own kitchens, where love is the secret ingredient that makes everything taste better.
When you master this cachopo recipe, you’re not just learning a new dish—you’re adding a memory-maker to your culinary repertoire. The looks of delight when you bring this golden, crispy creation to the table are worth every minute of preparation.
So put on your favorite music, pour yourself something nice to sip, and enjoy the process of creating this Spanish delight. And remember, in our kitchens, it’s not about perfection—it’s about the joy of creating something delicious for the people we love.
I’d love to hear how your cachopo turns out! Leave a comment below or tag me in your creations on social media. Happy cooking from my farmhouse kitchen to yours!
Print
Cachopo recipe: How to Make This 5-Star Spanish Delight
- Total Time: 45 minutes
- Yield: 4 servings 1x
Description
Ingredients
For this traditional cachopo recipe, you’ll need:
For the Cachopo:
-
- 4 large veal or beef fillets (about ¼ inch thick, pounded even thinner)
-
- 8 slices of good quality ham (Serrano or Ibérico for authenticity, but prosciutto works well too)
-
- 8 slices of semi-cured cheese (traditional Asturian cheese or substitute with provolone or Gouda)
-
- 2 cups all-purpose flour
-
- 4 large eggs, beaten
-
- 3 cups breadcrumbs (preferably panko for extra crispiness)
-
- 1 teaspoon salt
-
- ½ teaspoon black pepper
-
- 1 teaspoon paprika (Spanish if possible)
-
- Olive oil for frying
For Serving:
-
- Lemon wedges
-
- French fries
-
- Roasted red peppers
Instructions
Step 1: Prepare the Meat
Place your veal or beef fillets between plastic wrap and gently pound them until they’re about ⅛ inch thick. This is where patience pays off—thinner meat cooks more quickly and evenly. Season both sides with a little salt and pepper.
I like to use the flat side of a meat mallet for this, but the bottom of a heavy pan works in a pinch! This is similar to how I prepare the meat for my venison cube steak recipes, ensuring tenderness with each bite.
Step 2: Assemble the Filling
This is where the magic happens! Lay your thinned meat flat and layer 2 slices of ham and 2 slices of cheese on one half of each piece. Be sure to leave about a half-inch border around the edges.
Fold the other half of the meat over the filling, creating a pocket. Press the edges firmly to seal—think of it as making a giant savory empanada. If needed, use toothpicks to keep everything secure during cooking.
Step 3: Prepare the Breading Station
Set up your breading assembly line:
- First dish: Flour seasoned with salt, pepper, and paprika
- Second dish: Beaten eggs
- Third dish: Breadcrumbs
This organized approach makes the process much cleaner and more efficient.
Step 4: Bread the Cachopo
With gentle hands, coat each stuffed cachopo first in flour, shaking off any excess. Next, dip into the beaten egg, ensuring it’s fully coated. Finally, press into the breadcrumbs, covering every surface. For an extra-crispy finish, you can repeat the egg and breadcrumb steps.
Pro tip: Use one hand for dry ingredients and one hand for wet to avoid the dreaded “breaded fingers” that make this process messier than it needs to be!
Step 5: Fry to Golden Perfection
Heat about ½ inch of olive oil in a large, heavy skillet over medium-high heat. The oil is ready when a few breadcrumbs sizzle immediately when dropped in.
Carefully place your cachopo in the hot oil and cook until golden brown, about 3-4 minutes per side. Don’t rush this step—proper browning equals proper flavor!
Transfer to a paper towel-lined plate to absorb excess oil.
Step 6: Finish in the Oven (Optional)
For extra insurance that your cheese is perfectly melty and your meat is cooked through, place the fried cachopos on a baking sheet and finish in a 350°F oven for 5-7 minutes.
Step 7: Serve and Enjoy
Remove any toothpicks and serve immediately, garnished with lemon wedges, alongside crispy french fries and roasted red peppers for an authentic Spanish experience.
- Prep Time: 30 minutes
- Cook Time: 15 minutes
- Category: Main Course
- Method: Frying
- Cuisine: Spanish
Nutrition
- Serving Size: 1 cachopo
- Calories: 750 per serving
Keywords: cachopo recipe, Spanish cachopo, breaded veal recipe, Spanish meat dish, Asturian cuisine


