Table of Contents
I still remember the Sunday morning when Lila and I decided to make our traditional weekend biscuits, only to discover an empty milk carton in the fridge. My 6-year-old’s disappointed face nearly broke my heart until I remembered Grandma Hart’s secret: you don’t actually need milk to make delicious biscuits! That morning sparked my journey to perfect a biscuit recipe without milk that’s just as fluffy and delicious as the traditional version. Now whenever we’re out of milk (or accommodating dairy-free guests), we turn to these recipes that never disappoint.
If you’ve ever found yourself with a biscuit craving but no milk in sight, you’re in the right place. These milk-free biscuits have become a staple in our little yellow farmhouse, with each variation earning its own special place in our family cookbook.
Why You’ll Love This Recipe
There’s something wonderfully comforting about homemade biscuits, isn’t there? The way they fill your kitchen with that warm, bakery-fresh aroma. The satisfying feeling of pulling apart those flaky layers. And with this biscuit recipe without milk, you don’t need a fully-stocked fridge to enjoy that simple pleasure.
These biscuits are:
- Incredibly versatile – I’m sharing 7 variations that work for different dietary needs and flavor preferences
- Pantry-friendly – Made with basic ingredients you likely already have
- Quick to prepare – Ready in under 30 minutes from start to finish
- Budget-conscious – No specialty ingredients required
- Family-approved – Even my picky 3-year-old Caleb devours these (especially the cinnamon-sugar version!)
Whether you’re dairy-free by choice, suddenly out of milk, or simply looking to try something new, these biscuits deliver that homemade comfort we all crave.
Basic Biscuit Recipe Without Milk
Let’s start with my go-to basic recipe that forms the foundation for all the variations. This 3 ingredient biscuit recipe without milk uses water as the liquid, proving you don’t need dairy for a tender result.
Ingredients
- 2 cups all-purpose flour, plus extra for dusting
- 1 tablespoon baking powder
- 1 teaspoon salt
- 1/3 cup cold shortening or butter (for dairy-free, use shortening or plant-based butter)
- 3/4 cup cold water (approximately)
Equipment Needed
- Large mixing bowl
- Pastry cutter or two forks
- Measuring cups and spoons
- Biscuit cutter or drinking glass
- Baking sheet
- Parchment paper (optional but helpful)
Timing
- Prep Time: 10 minutes
- Cook Time: 12-15 minutes
- Total Time: 25 minutes
Step-by-Step Instructions
Step 1: Prepare Your Workspace
Preheat your oven to 425°F (220°C) and line a baking sheet with parchment paper. Dust your work surface lightly with flour.
Step 2: Mix Dry Ingredients
In a large bowl, whisk together the flour, baking powder, and salt until well combined. This ensures even distribution of the leavening agents for perfectly risen biscuits.
Step 3: Cut in the Fat
Add the cold shortening or butter to the flour mixture. Using a pastry cutter or two forks, cut the fat into the flour until the mixture resembles coarse crumbs about the size of peas. This creates those wonderful flaky pockets in your biscuits.
Tip: Make sure your shortening or butter is COLD! I sometimes pop mine in the freezer for 10 minutes before starting. Cold fat creates steam pockets during baking, which results in flakier biscuits.
Step 4: Add Water Gradually
Add the cold water a little at a time, stirring gently with a fork after each addition. You may not need all the water – you want a dough that’s just moist enough to come together but not sticky. Stop adding water when the dough begins to pull away from the sides of the bowl.
Step 5: Form the Dough
Turn the dough onto your floured surface and gently pat it into a 1-inch thick rectangle. Be careful not to overwork the dough – the less you handle it, the more tender your biscuits will be.
Step 6: Cut Biscuits
Using a 2.5-inch round biscuit cutter or the rim of a drinking glass, cut the dough into rounds. Press straight down and lift straight up – don’t twist, as this can seal the edges and prevent proper rising. Place the biscuits on your prepared baking sheet, leaving about an inch between each.
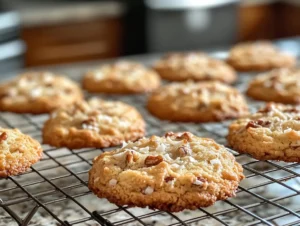
Step 7: Bake to Golden Perfection
Bake for 12-15 minutes until the tops are golden brown. I like to brush the tops with a little melted butter (or olive oil for dairy-free) right after they come out of the oven for extra flavor and a beautiful shine.
7 Delicious Variations
Now that you’ve mastered the basic recipe for biscuits without milk, let’s explore some exciting variations! Each one starts with the basic recipe above but incorporates different ingredients for unique flavors and textures.
1. Herb and Garlic Biscuits
Add 2 teaspoons of dried Italian herbs and 1 teaspoon of garlic powder to the dry ingredients. After baking, brush with olive oil infused with minced fresh garlic for an aromatic finish. These pair beautifully with soups and stews – we especially love them alongside my cornflake candy recipe for a sweet and savory combo at potlucks.
2. Sweet Cinnamon-Sugar Biscuits
Add 2 tablespoons of sugar to the dry ingredients. After cutting out the biscuits, brush the tops with a little water and sprinkle with a mixture of cinnamon and sugar before baking. These taste like a simplified cinnamon roll and are Lila’s absolute favorite weekend treat.
3. Coconut Milk Biscuits
Replace the water with the same amount of canned coconut milk (the full-fat version works best). This creates an incredibly rich, subtly sweet biscuit that’s still dairy-free. The slight coconut flavor works wonderfully in both sweet and savory applications.
4. Lemon-Pepper Biscuits
Add 1 tablespoon of lemon zest and 1 teaspoon of freshly ground black pepper to the dry ingredients. These bright, peppery biscuits are perfect alongside fish dishes or with a delightful salmon belly recipe.
5. Olive Oil Biscuits
Replace the shortening with 1/4 cup of good quality olive oil. The technique changes slightly here – mix the olive oil with the water, then add to the dry ingredients all at once. These biscuits have a distinct Mediterranean flavor that pairs beautifully with soups and salads.
6. Drop Biscuits
Instead of rolling and cutting the dough, add an extra 2-3 tablespoons of water to make a slightly wetter dough, then simply drop spoonfuls onto your baking sheet. These rustic biscuits have crispy exteriors and tender centers – perfect when you’re short on time!
7. Cheese and Chive Biscuits
Add 3/4 cup of dairy-free shredded cheese alternative (or regular cheese if dairy isn’t a concern) and 2 tablespoons of chopped fresh chives to the dry ingredients. These savory biscuits make a wonderful accompaniment to scrambled eggs at breakfast or alongside a hearty tortilla quiche bake recipe for dinner.
Cooking Tips
After years of making this recipe for biscuits without milk, I’ve gathered some helpful insights:
- Don’t overwork the dough: Handle it as little as possible for the tenderest results.
- Flour your cutter: Dip your biscuit cutter in flour between cuts to prevent sticking.
- For higher biscuits: Place them close together on the baking sheet – they’ll help each other rise upward instead of outward.
- For crisper edges: Space biscuits about an inch apart.
- No biscuit cutter? A small drinking glass works perfectly.
- Use cold ingredients: This creates steam during baking, which helps create those lovely layers.
A Little Story from the Farmhouse Kitchen
Last Christmas, my mother-in-law came to visit, and she follows a strict dairy-free diet. I wanted to make her feel special at our holiday breakfast, so I prepared these biscuits using the coconut milk variation. The look on her face when she took that first bite – realizing she could enjoy biscuits again after years of avoiding them – that’s the moment I knew this recipe needed to be shared far and wide.
She took the recipe home with her to Pennsylvania, and now calls them her “liberation biscuits” – free from dairy but not from flavor! Those connections over food, those moments of joy when someone tastes something they thought they couldn’t have – that’s what makes cooking so meaningful to me.
Nutritional Information
While exact nutritional content varies depending on which variation you choose, here’s a general overview for the basic biscuit recipe without milk (per biscuit, assuming you make 8 from the batch):
- Calories: Approximately 180-200 per biscuit
- Carbohydrates: 24g
- Protein: 3g
- Fat: 9g
- Fiber: 1g
- Sodium: 290mg
The water-based version tends to be lighter than traditional milk biscuits, and if you use olive oil instead of shortening, you’ll get the benefit of heart-healthy monounsaturated fats.
Healthier Alternatives
Looking to make these biscuits even more nutritious? Try these modifications:
- Whole wheat flour: Replace half the all-purpose flour with whole wheat for added fiber and nutrients. You may need to add a touch more liquid.
- Reduce sodium: Cut the salt in half if you’re watching your sodium intake.
- Add seeds: Fold in 2 tablespoons of flax or chia seeds for omega-3 fatty acids.
- Gluten-free option: Use a 1:1 gluten-free flour blend in place of all-purpose flour. My favorite is King Arthur Measure for Measure.
For a protein boost, these biscuits pair wonderfully with my high protein breakfast biscuits recipe for a complete morning meal.
Serving Suggestions
These biscuits are wonderfully versatile. Here are some of my family’s favorite ways to enjoy them:
- Breakfast: Split and topped with jam, honey, or a fried egg
- Lunch: As a side with soup or salad
- Dinner: Alongside stews or as a base for veggie shortcakes
- Dessert: Top with macerated berries and whipped coconut cream
My husband Eric particularly loves them with savory toppings like avocado and tomato, while Lila prefers hers with a drizzle of honey.
Common Mistakes to Avoid
Even the best home cooks can run into biscuit troubles. Here’s how to sidestep the most common issues:
- Tough biscuits: Usually caused by overworking the dough. Mix just until combined.
- Flat biscuits: Check if your baking powder is fresh – it loses potency after 6 months.
- Burning on the bottom: Position your rack in the middle of the oven, not too close to the heating element.
- Dough too sticky: Add flour a tablespoon at a time until manageable.
- Dough too dry: Add water a teaspoon at a time until the dough just comes together.
Storing & Reheating Tips
Freshly baked biscuits are always best, but these store surprisingly well:
- Counter storage: Keep in an airtight container for 1-2 days.
- Refrigerator: Store for up to 5 days in a sealed container.
- Freezer: Place cooled biscuits in a freezer bag for up to 3 months.
To reheat, wrap in foil and warm in a 350°F oven for 5-7 minutes, or microwave for 15-20 seconds. For frozen biscuits, add a few extra minutes to the reheating time.
I often make a double batch on weekends so we have quick sides for weeknight dinners. A 10-second warm-up in the microwave, and they’re almost as good as fresh!
FAQs
Can I use this recipe for biscuits without milk for drop biscuits?
Absolutely! Simply add an additional 2-3 tablespoons of water to make a slightly wetter dough, then drop by spoonfuls onto your baking sheet. Bake as directed.
What’s the best substitute for milk in this 3 ingredient biscuit recipe without milk?
Water works surprisingly well, but for richer flavor, try coconut milk, plant-based milk alternatives, or even unsweetened apple juice for a subtle sweetness in breakfast biscuits.
How can I make my recipe for biscuits without milk more flavorful?
Try brushing the tops with melted butter, olive oil, or even honey before and after baking. Adding herbs, spices, or citrus zest to the dry ingredients can also boost flavor significantly.
Final Thoughts
There’s something deeply satisfying about pulling a tray of golden biscuits from the oven, knowing you’ve created something delicious despite not having all the “traditional” ingredients on hand. This biscuit recipe without milk has become one of my most treasured kitchen solutions – proving that limitations often lead to the most creative cooking.
Whether you’re dairy-free by choice, temporarily out of milk, or simply curious to try something new, I hope these biscuits bring as much joy to your table as they have to ours. Remember, cooking isn’t about perfection – it’s about creating moments of connection and satisfaction with what you have available.
I’d love to hear which variation becomes your favorite! Drop me a comment below, or share your own spin on this recipe. Until next time, from my farmhouse kitchen to yours.

Biscuit Recipe Without Milk: 7 Delicious Variations to Try
Total Time: 25 minutes
Yield: 8 biscuits 1x
Description
Craving biscuits but out of milk? Explore our biscuit recipe without milk and discover 7 delicious variations to satisfy your cravings. Try today!
Ingredients
Scale
- 2 cups all-purpose flour, plus extra for dusting
- 1 tablespoon baking powder
- 1 teaspoon salt
- 1/3 cup cold shortening or butter (for dairy-free, use shortening or plant-based butter)
- 3/4 cup cold water (approximately)
Instructions
Preheat your oven to 425°F (220°C) and line a baking sheet with parchment paper. Dust your work surface lightly with flour.
In a large bowl, whisk together the flour, baking powder, and salt until well combined. This ensures even distribution of the leavening agents for perfectly risen biscuits. Add the cold shortening or butter to the flour mixture. Using a pastry cutter or two forks, cut the fat into the flour until the mixture resembles coarse crumbs about the size of peas. This creates those wonderful flaky pockets in your biscuits. Tip: Make sure your shortening or butter is COLD! I sometimes pop mine in the freezer for 10 minutes before starting. Cold fat creates steam pockets during baking, which results in flakier biscuits. Add the cold water a little at a time, stirring gently with a fork after each addition. You may not need all the water – you want a dough that’s just moist enough to come together but not sticky. Stop adding water when the dough begins to pull away from the sides of the bowl. Turn the dough onto your floured surface and gently pat it into a 1-inch thick rectangle. Be careful not to overwork the dough – the less you handle it, the more tender your biscuits will be. Using a 2.5-inch round biscuit cutter or the rim of a drinking glass, cut the dough into rounds. Press straight down and lift straight up – don’t twist, as this can seal the edges and prevent proper rising. Place the biscuits on your prepared baking sheet, leaving about an inch between each. Bake for 12-15 minutes until the tops are golden brown. I like to brush the tops with a little melted butter (or olive oil for dairy-free) right after they come out of the oven for extra flavor and a beautiful shine.
- Prep Time: 10 minutes
- Cook Time: 15 minutes
- Category: Bread
- Method: Baking
- Cuisine: American
Nutrition
- Serving Size: 1 biscuit
- Calories: 190
Keywords: dairy-free biscuits, easy biscuits without milk, quick homemade biscuits, no-milk biscuit recipe, pantry staple biscuits