Table of Contents
There’s something magical about the first strawberry harvest of the season. Just last weekend, I found myself knee-deep in my little garden patch behind our yellow farmhouse, with Lila giggling alongside me as we filled our baskets with ruby-red berries. We had so many that even after making our traditional strawberry shortcake, I still had pounds of berries left. That’s when I remembered my grandmother’s strawberry wine recipe – a tradition I’m excited to share with you today. This homemade strawberry wine recipe transforms those juicy berries into a delightful adult beverage that’s perfect for summer evenings on the porch.
Making wine at home might sound intimidating (I certainly thought so at first!), but I promise it’s much simpler than you might think. My first attempt years ago had Eric and me laughing over my “science experiment” in the pantry, but the results were surprisingly delicious. Now it’s become our annual tradition when berries are at their peak.
Why You’ll Love This Strawberry Wine Recipe
This strawberry wine recipe is perfect for beginners and experienced home brewers alike. Here’s why you’ll fall in love with this process:
- Uses simple, accessible ingredients you can find at any grocery store
- Requires minimal equipment (no fancy wine-making kit necessary!)
- Creates a beautiful ruby-colored wine with a delicate strawberry flavor
- Makes a wonderful homemade gift for friends and family
- Allows you to control the sweetness level to your preference
- Provides a creative way to use up abundant strawberry harvests
- Creates a beautiful talking point for gatherings (“Yes, I made this wine myself!”)
Plus, there’s something deeply satisfying about transforming simple fruits into something so sophisticated through the ancient art of fermentation. It connects us to generations of home vintners before us who created celebratory drinks from the fruits of their gardens.
Ingredients
For this strawberry wine recipe, you’ll need:
- 4 pounds fresh strawberries (preferably ripe and in-season)
- 2 pounds granulated sugar
- 2 lemons, juiced and zested
- 1 orange, juiced and zested
- 1 gallon filtered water (chlorine-free)
- 1 package wine yeast (Champagne or Montrachet variety works best)
- 1 teaspoon yeast nutrient (available at brewing supply stores)
- 1 Campden tablet (optional, helps prevent spoilage)
Substitution tips:
- If fresh strawberries aren’t available, frozen berries work well too – just thaw them completely first
- Honey can replace sugar (use 1.5 pounds instead of 2 pounds)
- If you can’t find wine yeast, bread yeast can work in a pinch, though the flavor profile will be different
- Bottled spring water is a good alternative to filtered water
Equipment Needed
- 1-gallon glass carboy or food-grade fermenting bucket
- Airlock and bung (or balloon with tiny pin holes as a makeshift airlock)
- Large pot for heating
- Fine mesh straining bag or cheesecloth
- Funnel
- Siphon tube (optional but helpful)
- Wine bottles and corks (for final storage)
- Sanitizing solution (important for preventing contamination)
Timing
- Prep Time: 1 hour
- Primary Fermentation: 7-10 days
- Secondary Fermentation: 3-6 months
- Aging (Optional): 6-12 months
- Total Time: Minimum 3 months for a young wine, ideally 6-12 months for best flavor
I know patience isn’t always my strong suit (just ask Eric about the time I tried to “speed up” my sourdough starter), but this strawberry wine truly gets better with time. The aging process allows the flavors to develop complexity and for the wine to clarify naturally.
Step-by-Step Instructions
Step 1: Sanitize Your Equipment
First things first – the most important step in any fermentation project is cleanliness! Sanitize all equipment that will come in contact with your wine using a brewing sanitizer solution. This prevents unwanted bacteria from spoiling your batch.
This is something I learned the hard way when my first batch turned into strawberry vinegar instead of wine! Little Caleb actually still likes to dip his bagel in that mistake, so I guess it wasn’t a total loss.
Step 2: Prepare the Strawberries
Wash the strawberries thoroughly and remove the green tops. Place them in a large bowl and mash them well with a potato masher or clean hands until you’ve created a pulpy mixture. The more you break them down, the more flavor will be extracted.
I usually let Lila help with this part – she calls it “strawberry squishing” and considers it the most fun kitchen task ever. Just be prepared for red-stained little fingers!
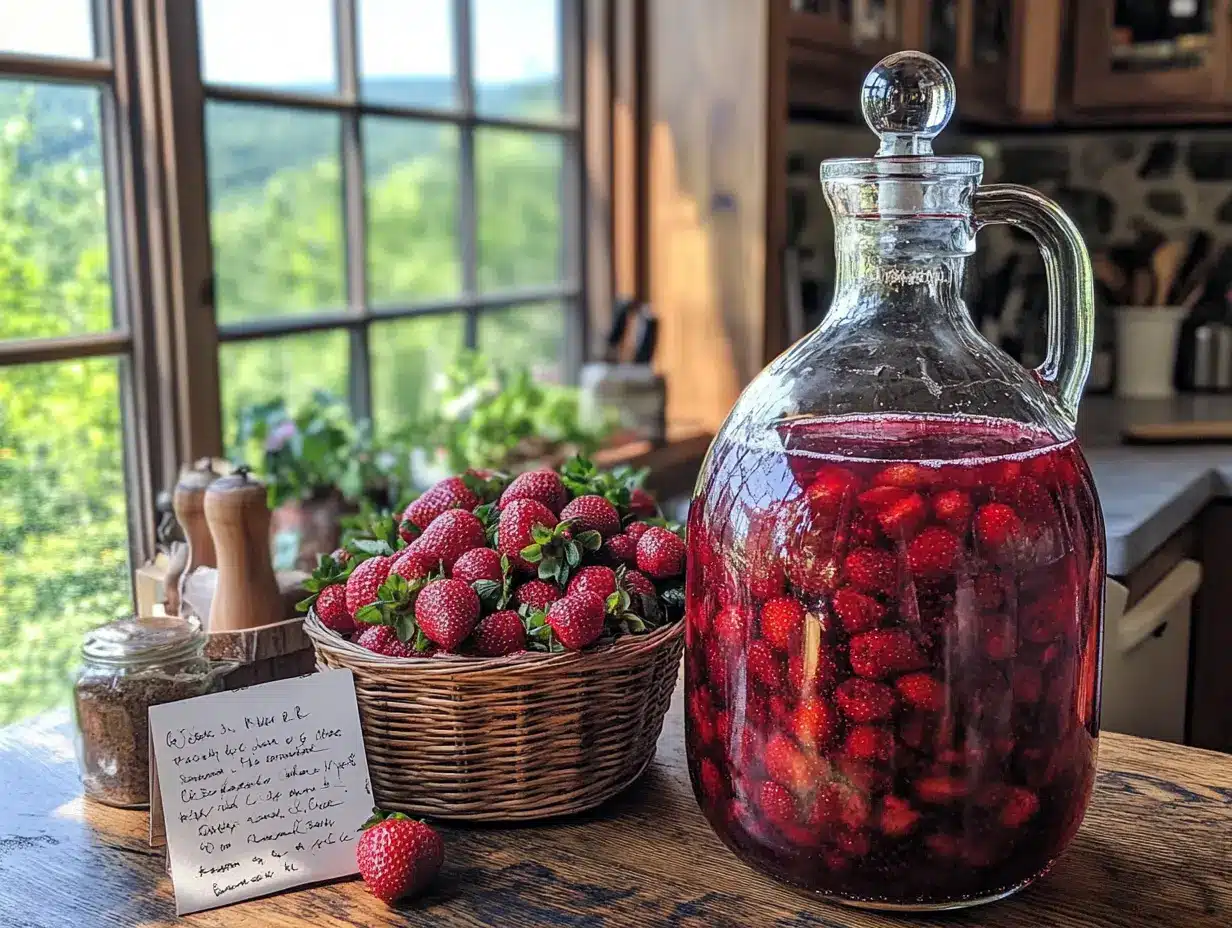
Step 3: Create the Primary Fermentation Mixture
Transfer the mashed strawberries to a fine mesh straining bag and place in your sanitized fermenting bucket or carboy. In a large pot, bring half the water to a boil, then dissolve all the sugar into it, creating a simple syrup. Allow this syrup to cool to room temperature.
Once cooled, add the syrup to the fermenting vessel with the strawberries. Add the lemon juice, lemon zest, orange juice, and orange zest. The citrus adds necessary acidity and complexity to the wine.
Step 4: Add Remaining Water and Check Temperature
Add the remaining filtered water to bring the total volume to about one gallon, leaving a few inches of headspace in your fermenting vessel. Check the temperature of the mixture – it should be between 70-75°F (21-24°C) before adding the yeast.
Step 5: Prepare and Add the Yeast
Follow the instructions on your wine yeast package to activate it. Usually this involves rehydrating the yeast in a small amount of warm water for 15 minutes. Once activated, add the yeast and yeast nutrient to your fermenting vessel and stir gently.
Step 6: Begin Primary Fermentation
Secure your airlock (filled halfway with water or sanitizing solution) onto your fermenting vessel. If using a balloon as a makeshift airlock, place it over the opening of your container and prick 2-3 tiny holes in it with a sterilized pin.
Place the vessel in a dark, room-temperature location (68-75°F is ideal). Within 24-48 hours, you should see bubbling activity in the airlock, indicating fermentation has begun.
Step 7: Monitor Primary Fermentation
For the next 5-7 days, gently stir the mixture daily with a sanitized spoon, being careful not to splash (which can introduce oxygen). After stirring, always replace the airlock.
The primary fermentation is quite active – you’ll see bubbling and foam. This is when the yeast is happily consuming sugar and converting it to alcohol. It’s also when your kitchen will start to smell like a winery!
Step 8: Strain the Fruit
After 7-10 days, when the vigorous bubbling has slowed considerably, it’s time to remove the fruit. Using sanitized equipment, strain the liquid from the fruit pulp through your mesh bag or cheesecloth into a clean, sanitized secondary fermenting container.
This part can get messy – I recommend doing it over the sink or outside. The first time I did this, I ended up with strawberry splotches on my ceiling that took weeks to notice!
Step 9: Secondary Fermentation
Attach a clean airlock to your secondary fermenter and move it back to its dark, temperature-controlled location. The secondary fermentation is much less active but equally important – this is when the wine clears and develops its character.
Check the airlock occasionally to ensure it still has liquid and is functioning properly. You’ll notice the wine gradually becoming clearer as sediment falls to the bottom.
Step 10: Rack the Wine (Optional but Recommended)
After about 4-6 weeks in secondary fermentation, you may want to “rack” your wine – transfer it to a clean container, leaving the sediment behind. This improves clarity and flavor. To do this:
- Sanitize a new container and siphon tube
- Carefully siphon the wine from above the sediment layer
- Avoid disturbing the sediment as you transfer
- Re-seal with an airlock
You can repeat this racking process every few months if you wish for an exceptionally clear wine.
Step 11: Bottling
When your wine has cleared to your satisfaction (usually 3-6 months from the start), it’s time to bottle. Sanitize your bottles, siphon tube, and corks. Using the siphon, transfer the wine into bottles, leaving about 1.5 inches of space at the top.
Insert corks using a corking tool (you can rent these from brewing supply stores if you don’t want to purchase one). For a decorative touch, add shrink capsules or wax seals.
Step 12: Aging
While you can drink your strawberry wine young (after about 3 months total), it really develops wonderful complexity if you can wait 6-12 months. Store bottles on their sides in a cool, dark place.
Label your bottles with the date and perhaps a cute name – I call mine “Farmhouse Ruby” and draw little strawberries on the labels. Lila and I make it a crafting afternoon!
Cooking Tips
Here are some practical tips I’ve learned through my wine-making adventures:
- Temperature control is crucial – too cold and fermentation stalls, too warm and off-flavors develop
- Always use perfectly ripe strawberries – underripe berries lack flavor, overripe can introduce unwanted bacteria
- Don’t rush the process – good wine needs time to develop
- Taste your wine periodically during aging to understand how it evolves
- If your wine tastes too dry after fermentation, you can back-sweeten it before bottling (just be sure to use a stabilizer to prevent refermentation)
- Keep detailed notes of each batch – variations in fruit, sugar levels, and timing all affect the final product
Our Farmhouse Wine Story
The first time I made this strawberry wine recipe was five summers ago, shortly after we moved into our yellow farmhouse. We’d discovered an overgrown strawberry patch behind the old garden shed, and after rejuvenating it, were rewarded with a bumper crop. I remembered my grandmother telling stories of making fruit wines during World War II when grape wines were scarce, and decided to try my hand at it.
That first batch became the centerpiece of our first anniversary in the new home. Eric and I sat on our porch swing at sunset, sipping that ruby-colored elixir and planning our garden for the next year. Now it’s become our summer tradition – strawberry picking followed by starting a new batch of wine that we’ll enjoy in the colder months ahead.
The process connects me to the rhythms of the seasons and to my grandmother’s practical homemaking wisdom. There’s something deeply satisfying about creating something so special from fruit we’ve grown ourselves.
Nutritional Information
While this strawberry wine recipe creates an alcoholic beverage (approximately 10-12% ABV depending on sugar content and fermentation), it does retain some of the nutritional benefits of strawberries:
- Rich in antioxidants from the strawberries
- Contains vitamin C (though levels decrease during fermentation)
- Lower in sulfites than commercial wines when made at home
- Free from artificial colors and flavors
However, as with all alcoholic beverages, it should be consumed in moderation. A standard 5-ounce serving contains approximately 120-150 calories, primarily from the alcohol content.
Healthier Alternatives
If you’re looking to adapt this strawberry wine recipe for dietary concerns:
- Lower sugar version: Reduce sugar to 1.5 pounds for a drier wine with less residual sweetness
- Non-alcoholic version: Create a delicious strawberry cordial by skipping the fermentation – simply macerate strawberries in sugar syrup, strain, and add a touch of lemon
- Lower alcohol: Dilute the finished wine with a splash of sparkling water for a refreshing spritzer
- Sugar alternatives: Experiment with monk fruit sweetener or erythritol for a lower-glycemic option (though fermentation results may vary)
Serving Suggestions
Strawberry wine shines in several serving contexts:
- Serve chilled (around 45-50°F) in white wine glasses to appreciate the color and aroma
- Pair with summer salads, particularly those featuring crab or mild cheeses
- Offer alongside desserts that aren’t too sweet, like vanilla panna cotta or shortbread cookies
- Use as the base for a sophisticated sangria with fresh fruit
- Create a signature cocktail by mixing with prosecco for sparkling occasions
- Serve as an aperitif before dinner with light appetizers
I love serving this at our summer garden parties with a simple cheese board and watching guests’ surprise when I tell them the wine is homemade!
Common Mistakes to Avoid
Through years of making this strawberry wine recipe (with a few memorable failures along the way), I’ve learned to avoid these pitfalls:
- Poor sanitation: This is the #1 cause of ruined batches. Sanitize everything thoroughly!
- Impatience: Rushing fermentation or skipping aging will result in harsh flavors
- Exposure to air: Too much oxygen during secondary fermentation can lead to vinegar production
- Temperature fluctuations: Keep your fermenting area at a stable temperature
- Bottling too soon: Make sure fermentation is completely finished before bottling to avoid exploding bottles (a dramatic lesson I learned the hard way in our pantry!)
- Using chlorinated water: Chlorine can kill your yeast or create off-flavors
Storing & Reheating Tips
Proper storage is essential for preserving your strawberry wine:
- Store corked bottles on their sides to keep the cork moist
- Keep in a cool, dark environment (55-65°F is ideal)
- Avoid temperature fluctuations and direct sunlight
- Once opened, store in the refrigerator and consume within 5-7 days
- Unlike grape wines that may age for decades, fruit wines like this strawberry wine are best enjoyed within 2-3 years of making
As for reheating – don’t! This wine is always served chilled or at cool room temperature.
FAQs
Q: Do I need special equipment to make this strawberry wine recipe?
A: While dedicated wine-making equipment is helpful, you can start with basic kitchen items plus an inexpensive airlock and fermentation vessel. As you enjoy the hobby, you might want to invest in better equipment.
Q: Can I use frozen strawberries?
A: Absolutely! Frozen berries work wonderfully and are often more economical for large batches. Just thaw them completely before using.
Q: How do I know when fermentation is complete?
A: You’ll notice three signs: 1) No more bubbles in the airlock for several days, 2) The wine begins to clear naturally, and 3) The specific gravity reads 1.000 or below if you’re using a hydrometer.
Final Thoughts
This strawberry wine recipe represents everything I love about home cooking – connecting to seasonal bounty, creating something special from simple ingredients, and sharing the delicious results with loved ones. There’s a special pride in pouring someone a glass of your homemade strawberry wine and seeing their delight at the first sip.
What began as my experiment with excess strawberries has become a beloved tradition in our yellow farmhouse, marking the rhythm of our summers and providing cozy comfort in winter months when we open a bottle and remember warmer days.
I hope this strawberry wine recipe inspires you to try your hand at this ancient craft of home winemaking. It’s a wonderful way to preserve summer’s bounty and create something truly special from your garden or farmers’ market finds. Share your creations with me in the comments – I’d love to hear how your batches turn out!
Print
Strawberry wine recipe: How to craft the perfect drink at home
- Total Time: 1 hour
- Yield: 1 gallon 1x
- Diet: Gluten Free
Description
Ingredients
For this strawberry wine recipe, you’ll need:
- 4 pounds fresh strawberries (preferably ripe and in-season)
- 2 pounds granulated sugar
- 2 lemons, juiced and zested
- 1 orange, juiced and zested
- 1 gallon filtered water (chlorine-free)
- 1 package wine yeast (Champagne or Montrachet variety works best)
- 1 teaspoon yeast nutrient (available at brewing supply stores)
- 1 Campden tablet (optional, helps prevent spoilage)
Instructions
Step 1: Sanitize Your Equipment
First things first – the most important step in any fermentation project is cleanliness! Sanitize all equipment that will come in contact with your wine using a brewing sanitizer solution. This prevents unwanted bacteria from spoiling your batch.
This is something I learned the hard way when my first batch turned into strawberry vinegar instead of wine! Little Caleb actually still likes to dip his bagel in that mistake, so I guess it wasn’t a total loss.
Step 2: Prepare the Strawberries
Wash the strawberries thoroughly and remove the green tops. Place them in a large bowl and mash them well with a potato masher or clean hands until you’ve created a pulpy mixture. The more you break them down, the more flavor will be extracted.
I usually let Lila help with this part – she calls it “strawberry squishing” and considers it the most fun kitchen task ever. Just be prepared for red-stained little fingers!
Step 3: Create the Primary Fermentation Mixture
Transfer the mashed strawberries to a fine mesh straining bag and place in your sanitized fermenting bucket or carboy. In a large pot, bring half the water to a boil, then dissolve all the sugar into it, creating a simple syrup. Allow this syrup to cool to room temperature.
Once cooled, add the syrup to the fermenting vessel with the strawberries. Add the lemon juice, lemon zest, orange juice, and orange zest. The citrus adds necessary acidity and complexity to the wine.
Step 4: Add Remaining Water and Check Temperature
Add the remaining filtered water to bring the total volume to about one gallon, leaving a few inches of headspace in your fermenting vessel. Check the temperature of the mixture – it should be between 70-75°F (21-24°C) before adding the yeast.
Step 5: Prepare and Add the Yeast
Follow the instructions on your wine yeast package to activate it. Usually this involves rehydrating the yeast in a small amount of warm water for 15 minutes. Once activated, add the yeast and yeast nutrient to your fermenting vessel and stir gently.
Step 6: Begin Primary Fermentation
Secure your airlock (filled halfway with water or sanitizing solution) onto your fermenting vessel. If using a balloon as a makeshift airlock, place it over the opening of your container and prick 2-3 tiny holes in it with a sterilized pin.
Place the vessel in a dark, room-temperature location (68-75°F is ideal). Within 24-48 hours, you should see bubbling activity in the airlock, indicating fermentation has begun.
Step 7: Monitor Primary Fermentation
For the next 5-7 days, gently stir the mixture daily with a sanitized spoon, being careful not to splash (which can introduce oxygen). After stirring, always replace the airlock.
The primary fermentation is quite active – you’ll see bubbling and foam. This is when the yeast is happily consuming sugar and converting it to alcohol. It’s also when your kitchen will start to smell like a winery!
Step 8: Strain the Fruit
After 7-10 days, when the vigorous bubbling has slowed considerably, it’s time to remove the fruit. Using sanitized equipment, strain the liquid from the fruit pulp through your mesh bag or cheesecloth into a clean, sanitized secondary fermenting container.
This part can get messy – I recommend doing it over the sink or outside. The first time I did this, I ended up with strawberry splotches on my ceiling that took weeks to notice!
Step 9: Secondary Fermentation
Attach a clean airlock to your secondary fermenter and move it back to its dark, temperature-controlled location. The secondary fermentation is much less active but equally important – this is when the wine clears and develops its character.
Check the airlock occasionally to ensure it still has liquid and is functioning properly. You’ll notice the wine gradually becoming clearer as sediment falls to the bottom.
Step 10: Rack the Wine (Optional but Recommended)
After about 4-6 weeks in secondary fermentation, you may want to “rack” your wine – transfer it to a clean container, leaving the sediment behind. This improves clarity and flavor. To do this:
-
- Sanitize a new container and siphon tube
-
- Carefully siphon the wine from above the sediment layer
-
- Avoid disturbing the sediment as you transfer
-
- Re-seal with an airlock
You can repeat this racking process every few months if you wish for an exceptionally clear wine.
Step 11: Bottling
When your wine has cleared to your satisfaction (usually 3-6 months from the start), it’s time to bottle. Sanitize your bottles, siphon tube, and corks. Using the siphon, transfer the wine into bottles, leaving about 1.5 inches of space at the top.
Insert corks using a corking tool (you can rent these from brewing supply stores if you don’t want to purchase one). For a decorative touch, add shrink capsules or wax seals.
Step 12: Aging
While you can drink your strawberry wine young (after about 3 months total), it really develops wonderful complexity if you can wait 6-12 months. Store bottles on their sides in a cool, dark place.
Label your bottles with the date and perhaps a cute name – I call mine “Farmh
- Prep Time: 60 minutes
- Cook Time: 0 minutes
- Category: Beverage
- Method: Fermentation
- Cuisine: American
Nutrition
- Serving Size: 5 oz
- Calories: 135 per serving
Keywords: homemade strawberry wine recipe, fruit wine making, strawberry wine fermentation, easy strawberry wine, summer fruit wine recipe